Wednesday, March 30, 2011
Blog Giveaway!
I know you are reading this - my statistics tell me so. So I am going to entice you to click on the "Follow" button (it's to the right - do you see it?). When you Follow my blog, I will enter your name into a drawing for a FREE D-sized STAMP SET from my stash! Cool, huh? I think so too! For every 10 followers, I will put those 10 names in AGAIN so you will want to tell your friends. If you comment anywhere on my site, your name will be entered AGAIN! So, you can get your name entered for a FREE stamp set worth $22.95 up to 3 times. I will do the tally on April 15, 2011 so you have time but not too much time! Get it? Good - now go Click and Comment!
Sophia Cards
I played around with the extra paper left over after finishing my Sophia Workshop and here's the result...


I loosely based the design and embellishments from the suggestion in the Workshop on the Go kit but didn't want to cut up all those little pieces so I used what I had on hand and did it my way! Kinda cute!


I loosely based the design and embellishments from the suggestion in the Workshop on the Go kit but didn't want to cut up all those little pieces so I used what I had on hand and did it my way! Kinda cute!
Sophia Workshop
I will be hosting a Workshop on April 17th from 6-9pm. YOU WILL WANT TO BE HERE! In addition to the two layouts will do using a beautiful paper pack, I will teach you some new, fun techniques to make 3D flowers to add to your layouts, cards, gifts and home decor. You do not want to miss this!


Payment is due in my hand by April 2nd (I accept credit cards) to reserve your spot. Due to the extra technique, I am only having 5 spots for this event! This my only event this month so don't miss it!
Thursday, March 24, 2011
How to Help Japan
We are all devastated by the destruction in Japan and many of us are looking for a way to help. One reason I love Close to My Heart is because this is a company that truely cares - for customers, consultants and those in need throughout the world. Our founder, Jeanette Lynton, has designed a special stamp set specifically to offer Hope for Japan. This size stamp set normally sells for $7.95 but this set is available for only $5. Please visit my website or contact me to order this stamp set. All proceeds will go directly to help in Japan. Visit the link below for the announcement from Jeanette's blog. Together, we can make a difference.
Hope for Japan
 We've all been reeling with the images of tragedy and devastation in Japan. If you're looking for an easy, real, practical way to help relief efforts, then I invite you to contact your Close To My Heart Consultant!
Typically, our A-size sets retail for $7.95/$8.75 CAN, but the "Hope for Japan" set will be available through April 30 for just $5--and Close To My Heart will be donating 100% of the profits to the American Red Cross to benefit relief efforts in Japan.
If we all do a little, together we can do a lot. Let's show our support and together, provide real HOPE for Japan!
Hope for Japan

Typically, our A-size sets retail for $7.95/$8.75 CAN, but the "Hope for Japan" set will be available through April 30 for just $5--and Close To My Heart will be donating 100% of the profits to the American Red Cross to benefit relief efforts in Japan.
If we all do a little, together we can do a lot. Let's show our support and together, provide real HOPE for Japan!
Sunday, March 6, 2011
Tutorial: Jewelry Frame
I've been browsing other blogs and noticed something they have that I don't: tutorials. So, I am going to try one. I should do one on a scrapbook page or a card but I've been wanting to do this project for awhile so this is what you get! :)
 First step is to gather your supplies. For my project, I had a picture frame, fabric square, double sided foam tape, utility scissors, cork squares and (not pictured) double sided adhesive.
 If your picture frame came packaged in cardboard, keep it to protect your work surface. Disassemble the picture frame and put the glass in a safe place. You won't need it for this project.
 Using the back of the frame for measurements, layout the cork squares. My squares were 12" and my frame is 16" x 18" so I will have to trim the cork.
 I have a pair of kitchen utility scissors that come apart for cleaning but you could use a box cutter or even a steak knife.
Cut a score line in the cork along using your cutter.
 Carefully fold the cork along the score line to break. Trim all pieces to fully cover the back of the picture frame.
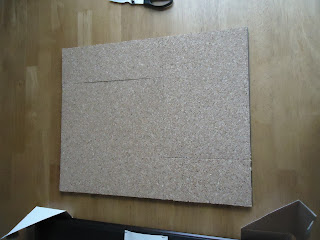
This is how my cut cork squares were arranged. I only needed to use a total of three of the squares. I put all the nicely finished edges towards the outside edge and any sides there were cut and scored towards the inside to create clean lines at the edge of the frame.
 If you haven't done so already, iron your fabric square. I didn't wash mine because I wasn't going to sew with it or wash it after the project was completed so I didn't have to worry about shrinking. Lay the fabric RIGHT SIDE DOWN and center your cork squares on top.
 Put strips of the double sided TAPE down all over the cork. I made sure to lay strips across a cut edge to help keep the squares from shifting during the process.
 Fold the edges of the fabric over and adhere to the tape. Make sure to pull the fabric so it's not loose. If you care how it looks, leave the corners undone and I will show you how to "miter" the corners. If you don't (it's the back, who's going to see it?) then you can skip ahead a few steps.
 This is a quick and dirty miter so don't be intimidated! I stuck a strip of double sided tape across the corner near the edge of fabric on the cork square.
 Then, I pinched the corner and pulled it tight across the cork square. Adhere the fabric to tape strip.
 Using the foam tape squares, stick them all over the back of the cork. Use as much as you want, but keep it from the edges (I didn't and it made the next step difficult and rather painful). About 2" from the edge should suffice.
Lay the picture frame back on top of the foam tape covered cork and adhere.

Place the frame backing into the frame and secure. This is the step where if you have those little swinging clips on the back, you'll need some give in the cork to get the clips in place. The cork is thicker than a picture, matting and glass but not my much. Even with my foam tape right at the edge, I got the clips to slide it but it took some work with a screwdriver to do it. I'd rather save you the agrivation!
 This is what mine looks like all assembled. While working with the fabric, I liked the wrong side of the fabric better than the correct side and it worked better in my room. What do you think?


Cut a score line in the cork along using your cutter.


This is how my cut cork squares were arranged. I only needed to use a total of three of the squares. I put all the nicely finished edges towards the outside edge and any sides there were cut and scored towards the inside to create clean lines at the edge of the frame.

 Put strips of the double sided TAPE down all over the cork. I made sure to lay strips across a cut edge to help keep the squares from shifting during the process.


Lay the picture frame back on top of the foam tape covered cork and adhere.

Place the frame backing into the frame and secure. This is the step where if you have those little swinging clips on the back, you'll need some give in the cork to get the clips in place. The cork is thicker than a picture, matting and glass but not my much. Even with my foam tape right at the edge, I got the clips to slide it but it took some work with a screwdriver to do it. I'd rather save you the agrivation!


All done and hanging in my room. My son asked me what I was doing and disappeared when I told him. When he came back, he handed me the dress up beads and told me to hang them too! His addition is the red Mardi Gras beads on the bottom.
This concludes this evening's edition of my blog tutorial. I hope you've enjoyed your time and I hope you come back again! If you decide to make one, post a picture of it here to share!
Tuesday, March 1, 2011
March Specials
There are some great specials this month! Check them out below to see how easy it is to earn FREE and DISCOUNTED products by hosting your own gathering. Contact me if you would like to learn more.

 This special is awesome! When you purchase $25 in My Acrylix Stamps (Stamp of the Month purchases count!) then you get a My Acrylix block for FREE! You need a block anyway, so why not get one free?! Please email me for more information on either of these specials or check out my website to start shopping!
Get the March Stamp of the Month for a discount or even for Free!


Subscribe to:
Posts (Atom)