Hello All!
It's been awhile since I've posted anything here since I've been more active on Facebook. I don't want you to forget about me so here's a little enticement to find me on Facebook -- today's my birthday (*yea!*) and I have a gift for you!
Check out my Facebook page to find out how you can get your free gift from me!

Showing posts with label gifts. Show all posts
Showing posts with label gifts. Show all posts
Tuesday, July 12, 2016
Monday, February 20, 2012
Valentine's Day treats for school
Last weekend, my son and I worked on the cards he was going to exchange with his preschool class for Valentine's Day. I chose to get the My Originals Sweet Surprises Card kit. The kit was the perfect size (10 pieces) for his class and there was candy involved - what kid could pass this up? Due to the fact that I was working as hard as he was I was not able to take as many photos as I would like. But I did get two!
Here is a photo of one of the finished cards:

And here is my son diligently working on assembly:

He was really proud to be able to hand out his cards to his friends that he made - there was even enough for his teachers too!
Here is a photo of one of the finished cards:
And here is my son diligently working on assembly:

He was really proud to be able to hand out his cards to his friends that he made - there was even enough for his teachers too!
Wednesday, December 28, 2011
Chocolate Tins
This is a quick and easy gift I made for my "bosses" at my volunteer job on Fridays. It has been "sweet" working for them this fall that I wanted make something pretty to brighten their day - and a little chocolate is never a bad idea. I got the idea from my sister consultant, Nicki (check her out at her blog here) who got the idea from Lisa Stenz (check her blog out here). Sorry, I don't have the links to their posts about their versions of the chocolate tins, but I know you'll enjoy browsing their sites looking for them yourself.
Here are two of my versions of the tins:
 For the tin on the left, I used a discontinued paper pack called Mistletoe (an beautiful assortment of tradional styled designs), Tulip cardstock (for the flower), White Daisy cardstock (for the the tag), Tulip ink, the September Stamp of the Month, Sweet Leaf ribbon and a Pearl Opaque gem.
For the tin on the right, I used Winter Wonderland paper pack, Sky cardstock, White Daisy cardstock (for the tag), Sky ink and the Dark Chocolate Striped Grosgrain ribbon.
I cut both tags from White Daisy cardstock and the flowers using the Art Philosophy Cricut cartridge. I used Liquid Glass to adhere the flower together while I worked on the rest of the tin. I wrapped each chocolate in a 1" x 3" strip of B&T paper and adhered with Tombow adhesive. The tag on the right, I used Sky ink sponged over an Art Philosophy cut snowflake I used from the gift tags I made (the second round, but that's another post). I tied each of the tags to the ribbon with waxy flax then made a bow with the ribbon. Each tin took about 15 minutes to make and were very well received. I do have to recommend buying an extra bag of chocolates if you are not strong of will. Even thought I bought chocolate with nuts (I'm allergic to nuts) I still had trouble not eating them as I worked. The veggie I had to snack on just weren't cutting the tempation!
Here are two of my versions of the tins:

For the tin on the right, I used Winter Wonderland paper pack, Sky cardstock, White Daisy cardstock (for the tag), Sky ink and the Dark Chocolate Striped Grosgrain ribbon.
I cut both tags from White Daisy cardstock and the flowers using the Art Philosophy Cricut cartridge. I used Liquid Glass to adhere the flower together while I worked on the rest of the tin. I wrapped each chocolate in a 1" x 3" strip of B&T paper and adhered with Tombow adhesive. The tag on the right, I used Sky ink sponged over an Art Philosophy cut snowflake I used from the gift tags I made (the second round, but that's another post). I tied each of the tags to the ribbon with waxy flax then made a bow with the ribbon. Each tin took about 15 minutes to make and were very well received. I do have to recommend buying an extra bag of chocolates if you are not strong of will. Even thought I bought chocolate with nuts (I'm allergic to nuts) I still had trouble not eating them as I worked. The veggie I had to snack on just weren't cutting the tempation!
Tuesday, December 27, 2011
Winter Weekend Crop
Now that the holiday rush is over, it's time to sit down and enjoy some peace and quiet... and get some scrapbooking done! I am hosting a Winter Weekend Crop in Lancaster February 10-12.
Get the application here.
Each guest will get a large work space in a well-lit room in a very comfy chair, a goodie bag, meals, contest and giveaways all weekend, a brand new Spring/Summer Idea Book and be undisturbed from your family while you crop till you drop! I will have supplies on hand for sale and mini-classes throughout the weekend. Cost is $150 and due by February 1. Space is very limited so don't wait - this will fill up!
Get the application here.
Email me for more information.
Get the application here.
Each guest will get a large work space in a well-lit room in a very comfy chair, a goodie bag, meals, contest and giveaways all weekend, a brand new Spring/Summer Idea Book and be undisturbed from your family while you crop till you drop! I will have supplies on hand for sale and mini-classes throughout the weekend. Cost is $150 and due by February 1. Space is very limited so don't wait - this will fill up!
Get the application here.
Email me for more information.
Monday, December 26, 2011
Christmas gifts
Now that Christmas has come and gone, I can share some of the gifts I made to give away. Here is the gift I made for my Father-in-law. His wife and I enjoy sharing lots of time scrapbooking together, even traveling to weekend crops together. (I have the best mother-in-law in the world!)
When he unwrapped this box, he smiled and began to put it down thinking the box itself was the gift. I smiled and told him to look inside. The smile on his face was precious - inside, he found two tickets to see his favorite gospel band, the Gaithers, when they come to town. To anyone else, the box would have been enough but every gift giver knows you have to buy (or make) for the receiver.

I used a discontinued paper pack, Grace, from Close to My Heart, as well as the cork letters (so easy with the adhesive already on the back) and Irresistibles chipboard cutouts. I inked the edges of the My Creations card box in Cocoa, adhered the paper to the box with Tombow adhesive (LOVE, Love, love this stuff) and used Glue Dots to make the key on the front "pop" to use as a handle to open the box. The box is made with a magnetic clasp inside so it latches securely.
When he unwrapped this box, he smiled and began to put it down thinking the box itself was the gift. I smiled and told him to look inside. The smile on his face was precious - inside, he found two tickets to see his favorite gospel band, the Gaithers, when they come to town. To anyone else, the box would have been enough but every gift giver knows you have to buy (or make) for the receiver.
I used a discontinued paper pack, Grace, from Close to My Heart, as well as the cork letters (so easy with the adhesive already on the back) and Irresistibles chipboard cutouts. I inked the edges of the My Creations card box in Cocoa, adhered the paper to the box with Tombow adhesive (LOVE, Love, love this stuff) and used Glue Dots to make the key on the front "pop" to use as a handle to open the box. The box is made with a magnetic clasp inside so it latches securely.
Monday, December 19, 2011
Christmas Gift Tags
I am loving how easy the Art Philosophy Cricut Cartridge is making my holiday gift giving this year! I am able to make some really easy gifts that look like a million bucks! Below are some of the gift tags I made to attach to the kids' gifts. I went a little more dramatic for the tags that will go on the adult gifts but for the kids' I kept it simple.
 I cut 14 of the tag from the Art Philosophy cartridge in Olive cardstock and 14 of the rectangle from White Daisy cardstock. Using the December 25th stamp set, I used Cranberry ink to stamp the image onto the white cardstock. Super easy!
 This the tag I am using for the adults' tags. I cut Barn Red cardstock to 4"x 6", White Daisy cardstock to 3.5" x 5.5". I used Olive ink with an image from the June Stamp of the Month stamp set and some of the gingham ribbon from the red collection. Since the adults actually care who the gift is from, I made it bigger to accommodate all the extra sentiments adults like.
I am loving how easy the Art Philosophy Cricut Cartridge is making my holiday gift giving this year! I am able to make some really easy gifts that look like a million bucks! Below are some of the gift tags I made to attach to the kids' gifts. I went a little more dramatic for the tags that will go on the adult gifts but for the kids' I kept it simple.

Friday, December 16, 2011
Christmas Advent Calendar
This post has taken me awhile to do, simply because I have been oddly uninspired after the initial thought of making an advent calendar. I really hate when that happens because the project will just sit on my table mocking me. Some projects I can set aside for months and months until inspiration will strike but my son was the driving force to get this finished. I'm still not 100% happy with the project but I have a whole year to redo it if I choose to do so. In the meantime, I have something that my son is happy to work with for the season, and really, that's all I care about. Though if you have any suggestions on how to better embellish the box, I'd love to hear your thoughts!
Here are some photos of the box and a few cards for your reference.


Here is a list of the 24 activities I used:
This post has taken me awhile to do, simply because I have been oddly uninspired after the initial thought of making an advent calendar. I really hate when that happens because the project will just sit on my table mocking me. Some projects I can set aside for months and months until inspiration will strike but my son was the driving force to get this finished. I'm still not 100% happy with the project but I have a whole year to redo it if I choose to do so. In the meantime, I have something that my son is happy to work with for the season, and really, that's all I care about. Though if you have any suggestions on how to better embellish the box, I'd love to hear your thoughts!
Here are some photos of the box and a few cards for your reference.


Here is a list of the 24 activities I used:
Saturday, December 3, 2011
I had been anticipating that this post would feature my advent calendar I've been working on but the pressure has been ruining my creative mojo so I've shelved that project until I feel more inspired. I moved on to my next project which is planning my team meeting for this coming week. It's also our Holiday party but I wanted to do a quick Make & Take for the gals to cross of something from their own To Do lists. Oddly, Close to My Heart posted a video on the exact project I was planning on doing so I'll share it with all of you!
For more information on the Art Philosophy Cricut cartridge check it out here.
For more information on the Art Philosophy Cricut cartridge check it out here.
Tuesday, August 9, 2011
Gift boxes made from Art Philosophy cartridge
Here are two examples of gift boxes I made from the Art Philosophy cartridge:
This is a pillow box I made using Kraft paper. I cut the box out at "Fit to Page" to make it as big as possible. I used the December Stamp of the Month: Mad About You" which is compatible with Art Philosophy (which means don't cut something out by hand until you've double checked the stamp carrier sheet for more information!!! Learn from my mistakes.... I cut all of these out by hand and all of them are on the cartridge!) I also stamped Juniper cardstock with Juniper ink with an image from the stamp set to make the band that goes around the box. I used Sorbet ink to make the hearts and bamboo and chocolate ink on Colonial White cardstock to make the rest. I accented with an arrow from the new Milestones Shapes.

 |

This is the "Fry Box" in Olive cardstock. I accented with chocolate grosgrain ribbon, a pewter ribbon slider (new), some Bling, and some pin clips that I just love. I am getting used to big embellishments (I'm rather plain in most things) but the new accessories are so darling I want to use them all!
Wednesday, July 27, 2011
While I've been waiting
While I have been (not so) patiently waiting for my new product to come so I can start playing with it, I've been using my time wisely. I am working on organizing my digital photo albums and getting caught up on sorting, tagging, and making copies for friends and family. Here are some of the photos I thought I posted before leaving for convention.
The first three are the roommate gifts I made using the My Creations Journal. I went a different direction with each of them so stretch myself (never a good idea when time is short) but I'm happy with the result.


The next four photos are the cards I did for the card swap. Each year, the consultants swap cards or small trinkets that they've made so imagine 1500 gals swapping cards every time we'd get together - it was so cool to see all the talent and generosity.


 I never feel like my work is up to par with other consultants but no one refused an offer to swap and I even had one lady track me down for a card I swapped with a friend of hers - that was a good feeling! ;)
This last one is the business card I did the night before I left. I was all done packing but still had some time to unwind (1am isn't the time to unwind, especially when I had to get up at 5am but I figured I'd sleep on the plane). I also made the little card holder too, I didn't want to take my nice one in case I lost it.

 I'll have some new stuff to post soon - in the meantime, enjoy your summer!
The first three are the roommate gifts I made using the My Creations Journal. I went a different direction with each of them so stretch myself (never a good idea when time is short) but I'm happy with the result.


The next four photos are the cards I did for the card swap. Each year, the consultants swap cards or small trinkets that they've made so imagine 1500 gals swapping cards every time we'd get together - it was so cool to see all the talent and generosity.


This last one is the business card I did the night before I left. I was all done packing but still had some time to unwind (1am isn't the time to unwind, especially when I had to get up at 5am but I figured I'd sleep on the plane). I also made the little card holder too, I didn't want to take my nice one in case I lost it.

Tuesday, June 21, 2011
Covered Recipe Box
This project has been in my "To Do" pile since I first saw the Fall/Winter 2010 catalog last August and I finally got to make it! Yea! It's a long picture tutorial, so follow along after the jump. PS This was super easy - I will be doing many more of these as wedding gifts with some family recipes inside.
More pictures after the jump ...
 |
| Finished Project - So easy to make! |
Journaling Book
This is a journal I made for an expo I'm going to this weekend - I realized I didn't have a whole lot to display so I spent my free crop day working on stuff for me! My gals are so good they barely need me anymore - unless it's to find something I've recently moved to a new location! I was able to create a lot of artwork today so you'll see more as the week progresses. Enjoy!


Friday, June 10, 2011
Jubilation: June Stamp of the Month
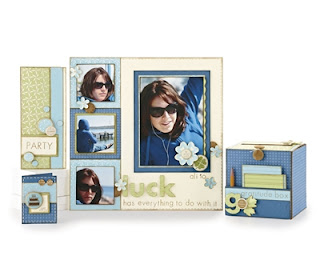
The June Stamp of the Month is extremely versatile - I love using this set for calendars, gift tags, 3 x 3 cards and more! I will be posting pictures as I make stuff (check out Wednesday's post) but make sure to check out the details on my website (stephaniehuber.myctmh.com) or email me for more information.



Tuesday, June 7, 2011


Saturday, April 30, 2011
This company is AMAZING!!!!
I have such a creative high right now! I have the awesome privileged to be in a unit of such amazing and talented consultants - I love what I do and as I get to know more of the wonderful ladies (and men) attached to CTMH I love getting to know every single one! One of my uplines in CTMH is Kathy Markloff. She has been with the company 20 years (and has all the Idea Books to prove it!!). Corp allowed only 5 top directors to host regional training events called LeaderShare. This is the first time for the events and Kathy was selected as one of the directors to have an event. Thankfully she lives in the same region I do (yea!) so it was a no-brainer for me to go. The cost of the event was so reasonable and the product we received to use during our creative time (*remember, this is a training event for us so of course we have to do some creating!*) far outweighed the price we paid to attend. I actually had the stamp sets in my arsenal already so I now have some additional sets to sell (bonus!) plus I got to learn and use some new-to-me products. Enough talking, pictures are worth a thousand words so here are some pictures to show you my day:
While we were there, some of the Corp execs dropped by to teach us Business Classes. Christine David spoke about goals and the importance of play. Brian showed us how to go from basic to advanced in our Studio J class in the afternoon. I learned so much! There are definitely things for me to work on but it was nice to sit and just play too! Here are the projects we did at our Creative Training:
And as with anytime this many creative people get together, there is always something being swapped - here is a picture of the card I made:
This is a picture of all the other items I got in the swap (Because I don't have permission to showcase someone else's work on my blog, the photo is purposely far away):
This was my fabulous day - being a consultant, if only to pay for my own habit with a great discount on products I already buy, is so much fun! I get to play every time I go to work and I love what I do! If you want more information on how you can have this much fun too, please stay tuned! CTMH has something WONDERFUL in store for you in the month of May!
 |
| Kathy Markloff |
 |
| Joyce Houck had little goodie bags for her "Shining Stars" |
 | |
| This was the largest group for LeaderShare |
 |
| This is a cute gift idea: Our My Creations Cube using Mayberry paper pack. |
 |
| A 2 page layout using paper from "Wings" (green) and "Bliss" (tan). |
 |
| 6 x6 card using "Friendship", February's Stamp of the Month |
 |
| My swap collection: three layouts, 5 cards & two gift holders (plus my creation) |
Subscribe to:
Posts (Atom)