Showing posts with label blog hop. Show all posts

Sunday, August 9, 2015

August Joyful Stars Blog Hop: Coffee Time!

Hi all!

Welcome to the August edition of the Joyful Stars Blog Hop. We are in the "Sneak Peek" month of the soon-to-be-unveiled Annual Inspirations and there are a few new products to share with you! If you've come from Marie's blog then you're on the right track. If not, just start here and follow the links till you've seen everything. If you get lost you can visit Joyce's blog for a complete list.

The Artistry Cricut Collection is quickly becoming my favorite cartridge ever!! There are so many on-trend images on this cartridge that I can't make cards fast enough! The card I made to share with you will be my Teacher's gifts for my kids' teachers in a few weeks because it is just so cute.


I used the "5" key using the icon and shift functions. I cut the card to 5" (tall) so it would fit into a 5x7 envelope to make it easy to mail. I used Colonial White for the base and a sheet of the new Paper Fundamentals as the cup and Desert Sand for the cozy. The gold heart is a special sneak peek from an item available in September (Shh!) Used a journaling pen to hand draw some fun designs instead of inking edges. The two sentiments come from the stamp sets included with the cartridge and I stamped them in the new Sapphire ink.


Now you're off to Lori's blog to see the fun she's cooked up. See you next month!

Thursday, July 9, 2015

Joyful Stars Blog Hop: Pathfinding Card Kit


Hi All!


Welcome to July's edition of the Joyful Stars Bog Hop. If you're coming from Marie's blog then you're on the right track. If you're starting here,  follow the links at the end of each post to circle 'round until you come back to where you started. If you get lost, you can go to Joyce's blog for the complete list. 


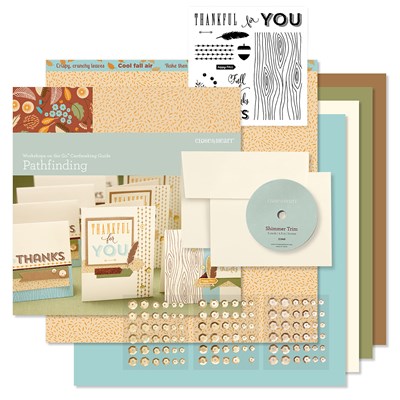
Currently I am in sunny California soaking up all the sunshine at CTMH's annual Convention! But with all my preparation before I left, I wanted to share with you one of my saving grace's: the Pathfinding Card Kit. This kit came in *very* handy for me this week. Even as a seasoned scrapper, I needed the convenience of this beautiful kit.


It always seems like I need thank you cards when I haven't been making them, and this past week was no exeption. I needed more than I had on hand. Cue the music! I rummaged through my stash (because we ALL have a stash!) and found this gem, unopened. I don't usually buy kits because - hello! I can do it myself. Famous last words! I remember buying this because I really liked the stamp set that came along with it. I loved the large stamp with the wood grain. I could do so many things with that stamp, I thought. Needless to say, it sat unopened most of  the year. *sigh*


The card kit makes 15 cards total, 3 styles of 5 cards each. The stamp set and card designs are all exclusive to the card kit and it's very easy to cut and assemble with the included instructions. I made this kit in about 30 minutes, with help from my two little helpers. I then sent out most of them in the mail that day. Thankfully, I had enough to start my stash again, so hopefully, I won't run out soon. :) Unfortunately, I didn't take a photo of all the cards before I sent them out - oops! But here's one that shows how easy and beautiful they turn out to be! ;)


Now you're off to Lori's blog to see her pretty creation. See you soon!

Monday, March 9, 2015

March Joyful Stars Blog Hop

Hi all! Welcome to another blog hop with the Joyful Stars!

I'm fresh off two weekends in two months of scrapbooking crops so I have some new stuff to show you over the next few weeks! If you're coming from Nickie's blog then you're on the right track. If you get lost along the way,  so at Joyce's blog for the complete list.

I shared this layout with you back in September but didn't have any photos or embellishments on it. Here it is again but all dolled up.

Now you're of to Jolene's blog. See you next month!

Monday, February 9, 2015

February Joyful Stars Blog Hop

Hi all and welcome to the February edition of the Joyful Stars blog hop!

If you came here from Betty's blog then you're on the right track. If you're starting here then just follow the link at the bottom of the post to hop over the next blog. So grab your coffee and enjoy the eye candy!

It's been awhile since I've created anything but I finally got away last weekend to a winter scrapbooking retreat and created some lovely layouts that I'll be sharing with you over the next few weeks but the first layouts I want to share are two, single pages I did to try out a new (to me) technique: scrapbooking only one photo per page.

I've seen these pages all over the magazines and I'm really too much of a shutterbug to ever think about this technique until I get to my retreat and realize that I have two single photos of two different events. Seems like the perfect time to try something new!


CTMH Chalk It Up with lagoon shimmer tape, Chalk It Up accessories and white enamel stars
 I used the Chalk It Up paper pack (which by this time is just scraps), the matching Chalk It Up accessories, Lagoon shimmer tape and white enamel stars. I inked the edges of all the paper with Lagoon ink and colored in the enamel stars with Bronze Shin Han marker.

CTMH Chalk It Up with lagoon shimmer tape, Chalk It Up accessories and white enamel stars
 I love this picture because my husband is actually *smiling* !!!
CTMH Chalk It Up with lagoon shimmer tape, Chalk It Up accessories and white enamel stars
 The other page I'm going to share with you is made using the Paper Fundamentals, Avonlea Picture My Life cards, sparkle flourishes and the twill ribbon.

CTMH Paper Fundamentals, Lagoon ink, Avonlea Picture My Life cards, sparkle flourishes & twill ribbon
I used the Lagoon stamp pad to color in the paper (carefully wiping the ink off the resist pattern) then adhering the Picture My Life cards in a pretty pattern and adding the flourishes and ribbon.

 (Sorry this is turned, I can't get Blogger and my photo editor to stop over-thinking each other)
CTMH Paper Fundamentals, Lagoon ink, Avonlea Picture My Life cards, sparkle flourishes & twill ribbon
Thanks for stopping by and leaving a comment (hint, hint). Now you're off to Marie's blog to see what she has for you. See you soon!

PS If you get lost along the way, check out Joyce's blog for the complete list.

Sunday, November 9, 2014

November Joyful Stars Blog Hop: A Christmas Card

Hi and welcome to the November Joyful Stars Blog Hop. It's a circular hop so no matter where you start just keep hopping till you come back again. If you get lost you can find the list at Joyce's blog. If you're coming from Krista's blog, you're on the right track.

I'm trying to get a jump on the holidays this year so I'm posting a Christmas card. My kids were at the table "helping" me so it's not the most complicated design ... but there's something elegant about it anyway!


The stamp set is a Hostess Reward set so make sure you talk to your Consultant to find out how you can get this exclusive set! To make the card, I used White Daisy and Lagoon cardstock with Lagoon & Silver (non-CTMH) inks with Lagoon twine (retired).

I used second generation stamping on the angel for a subtle effect.

Now you're off to Crystal's blog to see what she's created. See you next month!

Tuesday, September 9, 2014

Joyful Stars September Blog Hop: Scaredy Cat

Hi!

Welcome the September edition of the Joyful Stars Blog Hop. If you're coming here from Krista's blog then you're on the right track. It's a circular hop so just keep going till you come back to where you started. If you get lost along the way, stop over at Joyce's blog for a complete list. 

While at Convention in DisneyLand this past summer, I heard it mentioned that the Annual Inspirations book was set up in a way to encourage us consultants to go through it in order, one paper pack per month. If we do, it will line up in an appropriate time frame for sales to happen in time for our customers to be using the Thanksgiving paper pack (Pathfinding) at the Thanksgiving season, for example. Since I can always use a little structure in my creativity, I am following that advice. 

Last month, I explored the Chalk It Up paper pack and this month, I am exploring the Scaredy Cat paper pack. Since it does seem obvious for Halloween, I made two layouts for the Halloween season that I know I will use - the first one is for our costume/trick-or-treating photos and the second layout is for the pictures from my sister's (awesome) annual Halloween party that she hosts for the kids. 

I really wanted to try to push myself creatively (I've been in a slump lately) so I forced myself to use the Cricut cartridges exclusively on each page. I didn't make it to "exclusive" but I used the Artbooking cartridge for both layouts. 

Artbooking is a fun cartridge to work with even if you don't use one (or more) keys to do the entire layout. I cut the B&T paper to use a mats for the photos but let the Cricut do the fun stuff. 


One the first layout, I cut the "Trick or Treat" three times, once each on White Daisy, Sunset and Honey cardstocks. I carefully cut the Honey and Sunset cuts apart and glued them together on the White Daisy cardstock to mimic the look of a candy corn. 


I then cut out the candies and the candy borders on White Daisy and used our Glitz gels (retired) to make them shine. 


One the second layout, I went to Pinterest for inspiration. A lot of Halloween photos came up using this awesome haunted house cut from the Artbooking cartridge so I decided to give it a try.


 I cut the house and some bats out of black cardstock, the moon out of yellow (exact color is unknown but I know it's retired), the fences are from Gray Wool (retired) and the Halloween is from Sunset cardstock. I used the Stickease to embellish a bit and used my black journaling pen to highlight and embellish the Halloween. 


Now you're off to Nickie's blog. See you again soon! I'll be showing you other ways to use the Scaredy Cat paper pack for more than just Halloween.

Saturday, August 9, 2014

August Joyful Stars Blog Hop: Chalk It Up Workshop 2nd Layout

Welcome to the August edition of the Joyful Stars Blog Hop!


This is a circular hop so no matter where you start you can just keep going around till you get back here (or wherever you started). If you get lost along the way, stop over at Joyce's blog for a complete list. If you're coming from Krista's blog then you're on the right track!

CTMH Chalk It Up Workshop Layout 2 from LavendersageDesigns.blogspot.com
I used Pattern #3 from the Make It From Your Heart vol. 2 pattern book with leftover papers from the Chalk It Up workshop. I don't have a title or much embellishments because I'm waiting for some photos to develop to see what will fit ... this reminds me of the old Chicken and Egg question - which came first: the photos or the scrapbook layout? :)

If I go over board with the first day of school photos, then I'll use this in addition to this layout, but I could probably use it for beach pictures too.

What would you do to embellish the page?

Now you're off to my friend Nickie's page to see what she has to share!

Tuesday, August 5, 2014

August Stamp of the Month

With the introduction of the new Annual Inspirations, CTMH has changed how they do the Stamp of the Month program, which mostly affects consultants but you the customer get to benefit from it too.

In the past, consultants could only purchase the stamp of the months ahead of time with a large prepaid order of Idea Books. Not always easy for the little guys (like me) to be able to work ahead. Used to be, we could order a SOTM one month prior but we'd have to pay full retail price for it. Still not something a little guy (like me) could do. These are the two reasons you rarely saw SOTM projects from me - because I was purchasing them, like you, with my orders, usually at the end of the month.

However, that is in the past!!! Did you see the first few pages of the Annual Inspirations? All 12 SOTM sets are shown!!!!! That's right - you can see what the next twelve special stamp sets are going to be and plan your purchases accordingly! And - they are only $5 with a qualifying order! Seriously - this is a game changer for me! And here's the proof:

An August Stamp of the Month Card!!
Chalk It Up paper pack with August SOTM & ShinHan alcohol markers

I used Chalk It Up paper pack for the background and mat then stamped the images on White Daisy cardstock using the Archival Black stamp pad and let it dry overnight. I used the new ShinHan alcohol markers in Marigold, Golden Yellow and Barely Beige on the belly of the owl and the pumpkin (top) and Carmine for the mask that was stamped in Ruby ink. The feathers of the owl, I used Warm Gray 7, Warm Gray 4 and Clay.


Chalk It Up paper pack with August SOTM & ShinHan alcohol markers
 I wanted to compare the new ShinHan alcohol markers to the water-based markers of the past and you can tell the difference in the photo above. I used the same marking technique on both pumpkins but you can tell how much better the alcohol markers blend together as you color.

Chalk It Up paper pack with August SOTM & ShinHan alcohol markers
 I wanted to see what else I could color with the new markers, so I did the white enamel stars and the puffy prints from the Chalk It Up accessories. Cute!

This was a super fun project as I was able to experiment (successfully) with new products to show you how cute the Stamp of the Month is and how versatile the Chalk It Up paper pack is.

Check back on August 10th as I will be participating in the Joyful Stars Blog Hop with another Chalk It Up scrapbook layout I created.

Friday, August 1, 2014

Annual Inspirations Blog Hop: Chalk It Up layout


Welcome to the New Product Blog Hop featuring projects made from the New Annual Inspirations catalog from Close to My Heart!


I chose to re-work the Chalk It Up Workshop on the Go so there was no stamping or Cricut cutting. I usually only get to work when the kids are in bed so I needed an option that was fast and quiet! :)

I actually feel on top of things by making this layout for my son's first day of first grade coming up in a few short weeks (seriously, where did this summer go?!?!?)

You can check out two more versions of this layout - one with stamping and Cricut cutting and one with just stamping in the WOTG kit - talk to your consultant for more information.

I'll be posting more layouts I made with Chalk It Up throughout the month so I hope you stop back!

Enjoy hopping!


Wednesday, April 9, 2014

April Joyful Stars Blog Hop: Studio J

Welcome back to another edition of the Joyful Stars Blog Hop. If you're coming here from Cindy's blog then you're on the right track. It's a circular hop so if you get lost you can always visit Joyce's blog for a complete list.

This last month has been an extremely hard month for me but Close to My Heart had a fabulous deal all month long on Studio J layouts that I didn't want to miss out on. If you haven't tried Studio J, then you owe it to yourself to a take a half hour to make a beautiful layout - with or without pictures. There is so much to do on Studio J and this month I sat down and tried a bunch of techniques I've heard about from other consultants. I'm going to share my efforts with you now.

This is beautiful paper but I just didn't love it in person. On the computer screen, I fell in love with it! I loved that I could change the embellishment and cardstock colors to whatever I wanted and boom! I loved it! See that word collage on the right? I made that! The Stickease says "Be You" then using the individual letters, I added "TIFUL" below to it make it a title. Sweet, huh?
Studio J "Be-You-Tiful" layout from LavendersageDesigns.blogspot.com featuring Arianna


Just a few of the options to Studio J to help you think outside the box:

1. Create beautiful, quick pages with predesigned layouts, complete with photos, journaling and embellishments:

Studio J layout from LavendersageDesigns.blogspot.com featuring Jubilee

Studio J layout from LavendersageDesigns.blogspot.com featuring Lollydoodle
 2. Create beautiful, quick layouts with predesigned layouts (waiting for your own photos and embellishments):

Studio J layout waiting for photos from lavendersagedesign.blogspot.com

3. Print your photos!!! Seriously, this one hit me like bricks when I learned this was an option!
The best perk to being a consultant is getting to go to Convention each year. In 2013, CTMH had our annual convention in Disney World Florida! It. Was. Awesome! During one of our creative sessions they gave us an exclusive paper pack just for attending then showed us new layout designs to help us scrap our time at Disney. These photos are just a few of the highlights of my trip that I am printing using Studio J to fit onto the pages I've already made up. Quick and easy!

Use Studio J to print your odd size photos from lavendersagedesigns.blogspot.com

4. But wait! There's more!!!
I don't have examples of this to share with you, but want to tell you about them anyway. Picture My Life is a great way to quickly put a bunch of photos into a layout and now you can make you're own PML cards in Studio J. Want to use Arianna? Or  Lollydoodle? Now you can!! Simply choose the paper pack you want to use and the card sizes you want to use (3x4 or 4x6) and start designing. This is the project I'm currently working on now!

I will post more from my Studio J haul in other posts since they use retired paper packs. If you want to see them, make sure to follow my blog (click the link on the right sidebar) so you don't miss a post. Thank you!

Thanks for joining me as you travel this blog hop. Please take a moment and leave a comment as you travel. Now you're off to Lori's blog to see what she has to share. See you next month!!

Monday, March 3, 2014

Fun with Lollydoodle!


I absolutely adore the Lollydoodle paper pack and have created a lot of fun artwork using it. My daughter will be two in a few (short) weeks and I have been using this paper pack as I finish up her First Year album to be able to share it with family at her birthday party.

For this first layout, I used the layout from the Lollydoodle WOTG - I love how the colors really make you smile! My son is a budding photographer and he took the picture of his sister playing with the tulle of her skirt.


Buttons, stickers and bling

This second layout was a quick use of some of the scraps I had after I made so many layouts but I wanted to keep going! I used my 2" scallop punch and a "fit to page" saying from Artbooking to make this easy layout. 


This third layout is from the Make it From your Heart vol 2 (I forget which one, though). Used the new scallop border punch to make the fun border along the bottom of the pages and embellished with stickease, bling and the Lollydoodle Assortment.


Thanks for stopping by! Please leave a comment and tell me your favorite layout. See you next time!


Sunday, February 9, 2014

February Joyful Stars Blog Hop : Ivy Lane

Hi there!

It's time for February's Blog Hop with the Joyful Stars! If you've come from Krista's blog you're on the right track. If you're just starting here, at the bottom of the post you'll find a link for the next blog or you can check out the whole list at Joyce's blog.

Since the Spring/Summer 2014 Idea Book debuted on Feb. 1st, I chose the Ivy Lane paper pack. I was lucky enough to go to two crops in the last two weeks (thank you honey!) so I was able to make lots of layouts to share with you over the next few weeks (I'll be  posting a little more frequently because of that so if you don't already follow me, now's a good time so you don't miss anything!)

Ivy Lane is a fun, girly paper pack and it matched perfectly with the photos from my daughter's first birthday party last year (I can't believe I'm starting to plan her second birthday party in a few short weeks!)

I used Artbooking to cut out the words (from two different keys) in Hollyhock and inked all the edges in Smokey Plum. I chose not to used any other embellishments, because I think she's just sweet enough!

CTMH Ivy Lane from LavendersageDesigns.blogspot.com


This layout is just some fun shots of the family. My son is a budding photographer (taking after mommy, I suppose) and took the shot of my husband and I on the far right. It's my photography that needs work because I didn't have enough light as I was taking my pictures for this post.
CTMH Ivy Lane from LavendersageDesigns.blogspot.com


 I really like all the coordinating embellishments that CTMH gives for each paper pack because it makes designing and making layouts really easy and fun. These are from the Ivy Lane Assortment and make a fun grouping with the matching sticky Complements.
CTMH Ivy Lane from LavendersageDesigns.blogspot.com


This is the third layout using Ivy Lane and just a few of the randomness associated with a first birthday party with family.
CTMH Ivy Lane from LavendersageDesigns.blogspot.com


CTMH Ivy Lane from LavendersageDesigns.blogspot.com
Thanks for stopping by, now you're off to Helen's blog. If you get lost, you can find your way again by visiting Joyce's blog. Don't forget to leave a comment as you hop, we love hearing from you!!!

Monday, February 3, 2014

Spring/Summer 2014 Idea Book: New Goodies!!!


This post is for the Spring/Summer 2014 Idea Book Blog Hop.

I have been anxiously waiting to share this Idea Book with you for a few weeks now because this one is my favorite, by far!!!

There are just so many goodies inside this Idea Book that it was hard to pick just one to show you but I went the non-traditional route to show you some wearable art you can make with Close to My Heart.

Close to My Heart has expanded their Base and Bling collection to include Pendants!!! 

I don't wear a lot of jewelry for two reasons (I'm allergic to anything less than 18K gold and my little girl will grab it and rip it off of me - ouch!!) but I just had to try this new trend.

I used a 1" circle punch to punch a scrap B&T from Stella papers (retired) and Slate ink to stamp "J" and "S" from "A Typeface" stamp set. I used black marker for the "+" and a flower from the Frosted assortment. I used Liquid Glass to enamel everything together and let it dry overnight. The flower soaked up a lot of the Liquid Glass which was good to help stiffen the felt. I added three of the gems to the strand for our birthstones. I tried using the alcohol markers to color them but it didn't work out too well. 

This is a fun statement piece but it's so special to me because it is something I created. With a little help from CTMH, of course!!

And a close up ...

 Here is a second piece I did since I had so much to play with. On this necklace I used a glass bead to cover it and Liquid Glass to adhere the bead down. I'm not sure if I didn't let the ink dry before using the Liquid Glass but the next morning I noticed the ink spread through the adhesive. Not too noticeable except to me.


I hope you enjoyed my project! Have you tried the new Base & Bling yet? What do you think? Leave me a comment and tell me what you think!

Until next time!


Thursday, January 9, 2014

Joyful Stars January Blog Hop

Hi All! Welcome back to January's version of the Joyful Stars Blog Hop!! If you're coming from Krista's blog then you're on the right track. If you're picking up here, then you'll find the link for the next blog in the hop at the bottom of this post. All blogs are posted on Joyce's blog if you get lost. Let's get started!

This month is a wrap up of the holiday paper pack "Sparkle & Shine". I bought the WOTG (Workshop on the Go) so that I could take advantage of the all the goodies that come along with the papers and get the exclusive stamp set. After making the first layout from the WOTG I decided to venture out on my own to use up the paper pack (only because I put more pictures on a layout then the second one uses). I used the Make It From Your Heart vol 1 # 6 (pgs 16 & 17) to make this layout:


I used the Sparkles flair and pin banner from the Sparkle and Shine assortment to jazz up the left bottom corner.


I combined two images from stamp set to make a pretty corner decoration for the top right corner.


On the second layout, I used Pattern #2 from the MIFYH vol. 1


I used the Ruby (light) alcohol marker to brighten up the sparkles to create a contrast from the houndstooth pattern paper.

Using the Cricut, I cut a full page of  the stars for this stamp set out of White Daisy paper. I stored the left over stars in the stamp envelope for the next time I want to use the stamp set.


I also cut extras of each of the Cricut compatible stamp shapes to store in the stamp envelope.


Now you're off to Helen's blog. Have a crafty new year!!