With all the new paper packs that are in the new Spring Summer 2012 Idea Book, I have a really hard time choosing which one I like the best. I have a little boy so I love the Superhero and Victory paper packs and with a little girl on the way, I love that there are two paper packs (Stella and Lucy) I can use in her album but I'm going to have to pick Lucy as my favorite pack simply because I love how versatile it is: you can use it for a little girl's page, gardens or even for Mother's Day.
Here is a layout I am doing for my team's swap (**warning: spoiler alert**) using Lucy and the new stamp set: New Arrival. I was inspired by the layout featured on Jeanette Lynton's website on January 11, 2012. I simplified it a bit so I could make many copies. I used Gray Baker's Twine as the single embellishment on the right page so the photos really stand out.
Here is a close up of the main embellishment I did with the Art Philosophy cartridge in Creme Brulee card stock. I used Sweet Leaf ink on Sweet Leaf card stock with the little stamps in the New Arrival stamp set.
I used Sweet Leaf ribbon to make a banner to highlight the embellishment on the top left of the page. This image is also from the New Arrival stamp set.
Check back again in a couple of hours, I'll have some cards I made with the Victory paper pack and Family Love stamp set.
Showing posts with label embellishments. Show all posts
Friday, February 3, 2012
Monday, January 2, 2012
Using up leftovers, part two
Sometimes when I have no real direction but a strong desire to get crafty, some really crazy things happen. This time, I challenged myself. If you know me, I hate challenges. The very idea to challenge myself was clearly some sort of torture meant to cleanse me from something but I decided to honor it - sometimes, these things work out, I told myself. Well, this time it did.
My son was settled into a new movie from Christmas so I knew I had a chunk of time to myself. I had eight 3"x 3" cards cut out of Cocoa cardstock I had intended to use in a Christmas gift but never got around to using. I pulled out the small scraps (6" and under) from my Wonderland paper pack and played. The challenge was to use only those scraps, no stamping but any other kind of embellishment I wanted. I doubted I would make all eight but I wanted to be prepared. After an hour, my son came to me because the movie was over and when I counted, I had made eight cards! Wow, I was really impressed! Here's the result of my self-imposed challenge. With these results, I might have to continue this!
Monday, December 26, 2011
Christmas gifts
Now that Christmas has come and gone, I can share some of the gifts I made to give away. Here is the gift I made for my Father-in-law. His wife and I enjoy sharing lots of time scrapbooking together, even traveling to weekend crops together. (I have the best mother-in-law in the world!)
When he unwrapped this box, he smiled and began to put it down thinking the box itself was the gift. I smiled and told him to look inside. The smile on his face was precious - inside, he found two tickets to see his favorite gospel band, the Gaithers, when they come to town. To anyone else, the box would have been enough but every gift giver knows you have to buy (or make) for the receiver.
I used a discontinued paper pack, Grace, from Close to My Heart, as well as the cork letters (so easy with the adhesive already on the back) and Irresistibles chipboard cutouts. I inked the edges of the My Creations card box in Cocoa, adhered the paper to the box with Tombow adhesive (LOVE, Love, love this stuff) and used Glue Dots to make the key on the front "pop" to use as a handle to open the box. The box is made with a magnetic clasp inside so it latches securely.
When he unwrapped this box, he smiled and began to put it down thinking the box itself was the gift. I smiled and told him to look inside. The smile on his face was precious - inside, he found two tickets to see his favorite gospel band, the Gaithers, when they come to town. To anyone else, the box would have been enough but every gift giver knows you have to buy (or make) for the receiver.
I used a discontinued paper pack, Grace, from Close to My Heart, as well as the cork letters (so easy with the adhesive already on the back) and Irresistibles chipboard cutouts. I inked the edges of the My Creations card box in Cocoa, adhered the paper to the box with Tombow adhesive (LOVE, Love, love this stuff) and used Glue Dots to make the key on the front "pop" to use as a handle to open the box. The box is made with a magnetic clasp inside so it latches securely.
Wednesday, August 24, 2011
Christmas Layout using Sonoma
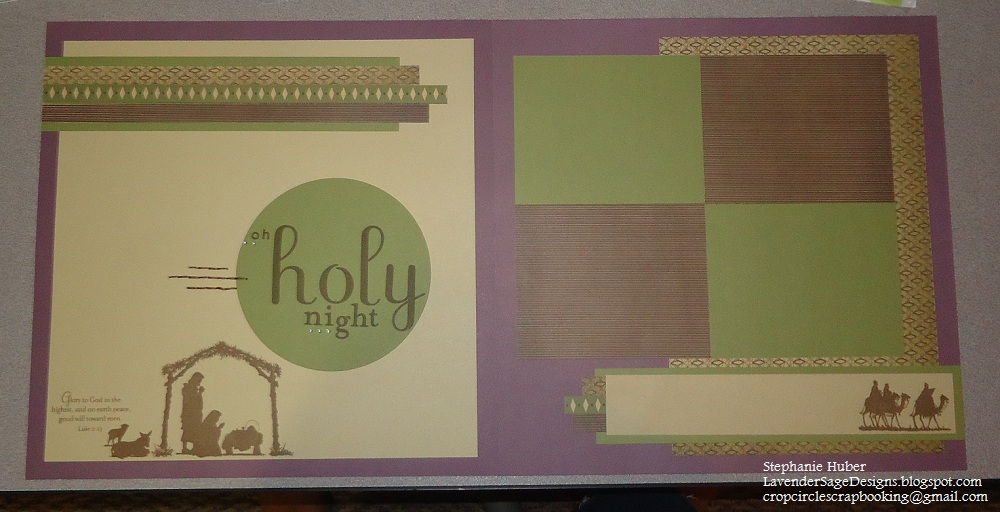
Here is the design I made for my team swap using Sonoma. I used the "Oh Holy Night" scrapbook page from the Idea Book (page 83) and matched it with the Quartet: Offset pattern from Reflections. It's kept me pretty busy to make so many but now I can concentrate on my Christmas Card Workshop and Scrapbook Workshop (using Typeset) in September. I am updating my Calendar with dates for the next few months so make sure you check your calendar too - I have lots of great papers and embellishments to show you!
Tuesday, June 21, 2011
Covered Recipe Box
This project has been in my "To Do" pile since I first saw the Fall/Winter 2010 catalog last August and I finally got to make it! Yea! It's a long picture tutorial, so follow along after the jump. PS This was super easy - I will be doing many more of these as wedding gifts with some family recipes inside.
More pictures after the jump ...
| Finished Project - So easy to make! |
Monday, June 6, 2011
Hope for Japan stamp set
I used Sophia B&T, black and Hollyhock cardstock. I actually sewed the buttons onto the cardstock before adhering to the card, something I only do when I have the time. I love using Liquid Glass to adhere my buttons but wanted to try something different. Enjoy!
I found the original - it came from Big Red Scraps. Check out her blog here.
Sunday, June 5, 2011
Christmas Cards in June
Here are some cards I'm working on for a Christmas In July card workshop. My upline's team usually hosts a large Christmas Card workshop in September but I wanted to do something before Mistletoe was retired - I love this paper pack!
More cards after the jump!
Saturday, June 4, 2011
Mayberry & Friendship
Here are some quick cards I made using Mayberry papers and Friendship stamp set (February's SOTM). I kept it simple but I think it's too simple. What do you think?
Easy cards from You & Me
I was on vacation this past week and really enjoyed my time away from reality - sitting on the beach is very therapeutic! My hubby requested that I take only a small stash of my papers along, the idea of a family vacation is that we spend time as a family, so I limited what I brought to one small rolling bag. My mother in law brought another box full of stuff down for me when she came for a few days so I was able to accomplish more than I thought I would. And my son actually took 2-3 hour naps each day! I won't bombard you with all I did in one post but I will have something to post every day for the next few weeks so make sure to check back often.
Monday, May 23, 2011
Embossing backgrounds
Since I joined Close to My Heart last fall, I've been in self-imposed exile from the local craft stores only so I'm not tempted to buy something I already have (a sad, but often repeated offense). But my dad's birthday party was fast approaching and I was in charge of favors, table numbers and other things my family thought I would like doing. As I was walking through the two craft stores who share a parking lot I was only finding things on sale that I needed to buy for the party. I had a 40% off coupon burning a hole in my pocket - actually I had given in to my son so I wouldn't forget it and he was waving it in front of me. Constantly. (He's good at helping me remember things)so I wondered over to an aisle I don't visit often - Cuttlebug, Cricut and Sizzix territory. I was lucky enough to find an embossing machine from Sizzix for a price I was willing to pay with the coupon and a folder I could use this weekend. This is the result:
I used a template from Wishes Card Confidence Program and some scraps left over from the Wings Workshop on the Go. The background image is from the Wings WOTG kit stamp set and the sentiment is from Treasures stamp set. The card base was embossed using the Sizzix then sanded.
Monday, April 25, 2011
Sophia Gift Basket
I was asked to donate a gift basket to a fundraiser for a program I volunteer for and I wanted to share with you what I did. Most of it was handmade (cards, bookmarks, etc) but there was some product too. I chose to use the "Sophia" paper pack because of the bright, spring colors.
Sunday, April 17, 2011
Lucky cards
Finally getting around to posting these cards I made for the "Lucky" Workshop on the Go in March. I have since used all of these because the paper pack is so versitle that I made them into birthday cards, thank you cards, gratitude and even a simple "hello". I used scraps from the workshop so I didn't follow the design too closely. But I am surprised by how addicting the wooden buttons are - I will definitely be ordering more of those!
Wednesday, March 30, 2011
Sophia Workshop
I will be hosting a Workshop on April 17th from 6-9pm. YOU WILL WANT TO BE HERE! In addition to the two layouts will do using a beautiful paper pack, I will teach you some new, fun techniques to make 3D flowers to add to your layouts, cards, gifts and home decor. You do not want to miss this!
Payment is due in my hand by April 2nd (I accept credit cards) to reserve your spot. Due to the extra technique, I am only having 5 spots for this event! This my only event this month so don't miss it!
Sunday, February 27, 2011
Studio J Layouts
I can say I am caught up in my scrapbooking for the year! Yea! CTMH had a special in February (it's not too late!!!) of "Buy 9, Get 1 Free". I took advantage - I had not tried Studio J yet! How am I supposed to be teaching you how to do it if I don't know how? In about two afternoons, I designed 10 layouts - I use the term "design" loosely has the Studio J software is so magical that all I *had* to do was upload my photos and place them into pre-designed layouts. I could add additional embellishments (some are already loaded into the layouts) or not. It was up to me! I kept some of the layouts simple to show you what comes pre-designed but other layouts I really added embellishments and manipulated papers and textures.
There are a few different ways to pay - but being a member is worth the investment! Regular price is $12.95 for a 2 page layout + shipping and handling. When you are a member (3 month membership is $30 or a 12 month membership is $99) you receive free page protectors, free shipping and handling once a month for up to 20 layouts, plus free .jpg files of your layouts to post to your blog, FaceBook, email to Grandma or to re-print at a local store. You earn back your membership costs fast with all the savings you get by being a member. The best part - if you're not sure you want to commit to membership right away, you can play for free for 3 months. You will not be charged anything until you try to buy your layouts. You will then be asked if you want the membership to reduce your costs - but that's up to you!
Check out the layouts I made and judge for yourself. If you would like more information or to see the layouts in person (to judge the quality) please contact me - I'd love to hear from you!
Since the post is long I will continue to post more tomorrow. Have a great day!
There are a few different ways to pay - but being a member is worth the investment! Regular price is $12.95 for a 2 page layout + shipping and handling. When you are a member (3 month membership is $30 or a 12 month membership is $99) you receive free page protectors, free shipping and handling once a month for up to 20 layouts, plus free .jpg files of your layouts to post to your blog, FaceBook, email to Grandma or to re-print at a local store. You earn back your membership costs fast with all the savings you get by being a member. The best part - if you're not sure you want to commit to membership right away, you can play for free for 3 months. You will not be charged anything until you try to buy your layouts. You will then be asked if you want the membership to reduce your costs - but that's up to you!
Check out the layouts I made and judge for yourself. If you would like more information or to see the layouts in person (to judge the quality) please contact me - I'd love to hear from you!
Since the post is long I will continue to post more tomorrow. Have a great day!
Tuesday, November 9, 2010
Prince of Peace
Doris Beachy made a beautiful card from the Magnifique paper pack. The Lagoon cardstock at the top is dry embossed then sanded to show the white core of the paper. Mocha Opaques are used to add some dimension to the card.
Saturday, October 23, 2010
Hooligans Christmas
Who says you can't use Halloween paper to make a Christmas card?!
Christmas Heart
This card design is really simple to make using scraps of miscellaneous Christmas colored paper. All of Close to My Hearts exclusive colors mix and match so well that even non-holiday specific paper designs can be used in a holiday specific card. The shaped brads are really flowers, but in White Daisy and a Christmas theme, they become snowflakes. Cute! The edges are distressed using scissors, exposing the white core of the cardstock and ink was used to distress the edges of everything else. This design is timeless!
"Magic" card
This is an interactive card from the new book "Magic". The darker green circle turns on the green brad to show sentiments (pictured) or photos. There are little Sparkles in the top ornament. This card was made by Nikki Hoffer for the Christmas Card Workshop in September. Only four designs down, lots more to go!
Friday, September 3, 2010
Quartet photo page
This is a layout I used from "Reflections", a layout design book from Close to my Heart. The paper kit and Stickease are from "Cutie Pie" (discontinued).
I ink distressed all the edges before assembling with "Brown Bag" ink pad.
Wednesday, September 1, 2010
Baby Baptism (12 x 12 Scrapbook page)
This is a Level 1 paper kit from Close to My Heart "Cutie Pie" (discontinued). This page took about 10 minutes to design and assemble, mostly due to finding the photos and deciding which embellishments to use.
The stamp in the upper right is CTMH but the ink is from Stampin' Up. The ribbon is from the craft store.
Subscribe to:
Posts (Atom)