Friday, September 28, 2012

87 Days till Christmas

Have you started designing your Christmas cards this year? It's closer than you think! Less than 90 days to go and what have you done? Keep reading for some designs sure to spark your creativity.

Monogram stamps aren't just for initials. Designer: Krista Hershberger

Make a tree out of ornaments. Designer: Nickie Hoffer

Emboss a few stars to create some twinkle in your card. Designer: Nickie Hoffer

A subtle image portrays the true meaning of Christmas. Designer: Krista Hershberger

Artiste Cricut cartridge can create some wonderful, out of the box cards. Designer: Gennette Feagan

Artiste makes an basic card anything but boring. Designer: Gennette Feagan

Wednesday, September 26, 2012

Christmas Card Workshop

I'm still recovering from my awesome weekend! I love papercrafting and the only thing that makes it better is getting to do it with friends. This past weekend was a lot of work to pull off but having so many great friends to do it with makes it worth all the extra effort. Here are a few photos of the day:

This is my "grandmother" Krista. Check her blog out at kristascraftycorner.blogspot.com

This is my "mother" Brenda Rutt teaching a group of ladies. She is a popular teacher at this event!

The best way to decorate a tree is with some handmade items! These are examples of cards we've made other years.
But I know you're really interested in the cards we made. Here are a few and I'll share the rest on Friday.

This one isn't a card but it is made with the new Artiste Cricut cartridge from Close to My Heart. Designer: Gennette Feagan.

Add any pretty flower to Christmas-y paper to have a great twist on the holiday. Designer: Sherri Reiff

Frosty Friends and Avonlea make a lovely card. Designer: Krista Hershberger

Dakota paper makes a great rustic background for a symbol of winter. Designer: Martha Zook

Peace is a constant theme throughout the holidays. Designer: Katie Fisher

A little sparkle lights up the Christmas tree. Designer:  Brenda Rutt

Monday, September 24, 2012

Idea Book Hunt {answer}

Reading over my post this morning, I noticed I didn't mention the answer to the Idea Book Hunt from last week. Did you find it? Look closely on page 2, it's the layout shown in the Gathering photo!

Evolution of a Christmas Card (Le Belle Vie)

Every year, my CTMH "grandmother" {check her out at kristascreativecorner.blogspot.com} invites her team to put on a Christmas Card Workshop as a Customer Appreciation event to our (collective) customers. I participated in this event before I even became a consultant and I was hooked! This is a massive undertaking and every year it turns out fabulously! This year, we were at maximum capacity. We had 50 guests come for a fun day filled with card making, giveaways, lunch and lots of fun techniques to try out - and lots of new cards to take home and use for Christmas cards.

And every year, I struggle to decide what I'm going to teach. Last year,  I made a gift card but it took me so long to decide what to do I wasn't able to pre-cut and assemble everything I was supposed to ahead of time and I was determined to not let it happen again. I'm glad to say I had everything done the week before but not without weeks of agonizing pain. I just wanted to create a great card for my great customers. I signed up to use Le Belle Vie and Merry & Bright stamp set, the rest was up to me.

Here are a few of my first drafts of the card - you can see I experimented with different cardstocks to see what would look best. The layout I used is from Originals called Lucky Three.


Colonial White base, with Olive mat and Smokey Plum cardstock

Black base, with Olive mat & Smokey Plum cardstock

Colonial White base with Smokey Plum mat & black cardstock

None of these really made me smile when I looked at it so I kept designing. After searching Pinterest (seriously, that site is addicting!) I found a card I did like (here's the original blog post) so I changed up my design. Here's my first draft:

I liked it but when I showed my friends to get their opinions on what embellishment(s) I should use to finish it off I got an answer that stumped me: burlap ribbon. Okay, not my first choice, but if they could see it and I love their work, then this is something I could do. After playing with the burlap for an evening and trying it this way and that, I stumbled on something I loved!

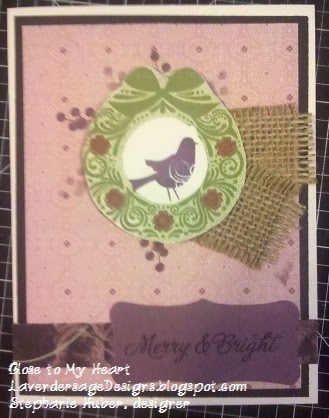
Here is the final design that I taught at the workshop:


I cut the tag for "Merry & Bright" from the Art Philosophy cartridge. I used Smokey Plum for the bird and the berry branches behind the wreath. The wreath was flipped over to use the back side of the stamp in 2nd generation Olive ink then cleaned and reversed on the block to stamp in 1st generation Olive ink directly over top. I used the new Ruby (light) alcohol marker to color in the flowers on the wreath. The wreath and burlap were adhered to the card using Liquid Glass.

This was a fun card to create and teach. Stay tuned this week as I share the other cards we made at the workshop. I will be hosting an all day card class in January where we will do other occasion cards to prepare for the year ahead (more info to come!).

Friday, September 21, 2012

Idea Book Hunt

Can you find this layout in the new Autumn/Winter 2012 Idea Book? I changed a few elements to match what I had on hand and to match my taste a little too. Did you find it? I'll tell you in Monday's post, hehe!


This was a layout I simply re-created with what I had on hand as the pack was starting to dwindle after making so many layouts with it - I only had scraps by this point. My last full piece of 12"x12" paper, thankfully was the Avonlea Teal so I chose to make this layout. I used the Art Philosophy Cricut cartridge to cut the mat for the 5x7 photo. I also used the Artiste cartridge to cut the background for the lacy flower on the Slate cardstock. I used Slate ink topped with a silver ink (non-CTMH) to give it a little dimension. I also used the Artiste cartridge to cut out three sizes of flowers and paired them with a sparkles flourish. This was a fun and quick layout when paired with the Cricut cartridges, so simple and easy!

Wednesday, September 19, 2012

Avonlea plus pink

I love clean and simple layouts, and if you haven't checked out the new Make It From Your Heart pattern book, you are missing out! For $7.95, this is a great value. In the book, you get 16 double page layouts (most with two different artwork samples), 2 single page layouts for your first and last pages of an album and 12 card layouts - this is a MUST HAVE on your work desk!

For this layout, I used Avonlea and the Make It From Your Heart layout #10. This will be a lovely layout for my Little Miss's album (which I have yet to start, ahem).

 
With this layout, I got a little inventive. I don't usually do this as when I try to re-create a layout as I like to stick pretty true to form. I figure if I'm attracted to a layout, there's a good reason why. Even without photos, this looked a little bland but I didn't have the embellishments on hand the original artist used. What was I to do? I looked through my embellishments and thought of all the clothes in Little Miss's closet (quite a lot, let me tell you!). What was I most likely going to put on this page? I have lots of photos of her in pink (pink seems to be a thing to put little girls in these days {smile}). I like it when my colors of the page blend with the colors in the photos so I added some pink to my layout intending to add pink photos. The sparkly swirls are AWESOME! With some pink & gray flowers from the Lucy embellishment pack (retired, sorry) I added a fun new color to the exclusive colors of Avonlea.

Monday, September 17, 2012

Second Avonlea layout

Continuing with the Avonlea paper pack, here is a layout I re-created from the Autumn/Winter 2012 Idea Book cover:


I didn't have all the exact pieces to completely re-create the page, but I made it my own with what I had on hand. I love how it turned out! I had found a stash of chipboard pieces I had apparently bought and forgot about then found while I was re-arranging my craft room. I had not thought I'd like using chipboard since I have my Cricut but these are so easy - just ink them up and adhere to your page. So easy! I linked them up with some gray twine as I did with the key from the Baroque Elements (which has adhesive on already - fabulous!).  I will definately be adding more chipboard pieces to my artwork in the future!


I used the Avonlea paper pack, Gray Wool twine, Baroque Elements, Avonlea Canvas complements, and various chipboard pieces, all CTMH. Check out my website to order.

Thursday, September 13, 2012

Avonlea

I've been pulling out just one paper pack at a time and trying to work my way through it before moving on to the next one and it's a plan that seems to be working. After revamping my craft room (yet again!) I'm finding this approach allows me the flexibility to work as long as I want or to get up and leave as the kids dictate. My craft room is still in the basement next to the kids toys and since Little Man is old enough not to need me around, this works well to allow me to work for longer periods of time (assuming that Little Miss is sleeping). It also allows me to have friends over to create together! This saves a lot of my sanity! Little Miss sleeps in the swing, Little Man has a playmate and I have a friend to talk/work with- we all win! My friend Nickie (check out her blog at livescraplove.blogspot.com) has been over a lot recently and I have a lot to share with you because of it!

Now, just a warning - everyone scrapbooks differently and my approach is not one I've seen others do so I thought I would warn you not to expect photos on my pages. When I scrapbook I produce lots and lots of pages. Then when I go to crops, I take the Work in Progress albums that I've filled with layouts and my printed photos from the last year or so and slap those pictures on the pages. In one weekend, I can start and finish a whole year at a time. This process is easy and my husband feels honored because I get *lots* of scrapbooking done on these weekends when he's home with the kids. Okay, enough chat - I know you only come here to see the artwork! Well, here's a layout I did with a new paper pack called "Avonlea".

Avonlea - left side


Avonlea - right side


Alcohol markers can color in the sparkles to make them match your page!
I used Avonlea paper pack, Avonlea Canvas Complements, Baroque embellishments and the sparkle brads that I colored with our new Alcohol markers (Sweet Leaf light, Twilight light and Ruby light).

Tuesday, September 11, 2012

Has it been that long already?

I must apologize! I really didn't think it had been that long since I had posted something - but I have been busy creating so I have no excuse. I have needed to create a lot recently to relieve some stress so I have LOTS to share with you over the coming weeks.

When I haven't been creating, I've been picking up a new hobby - photography! I found that one reason I didn't like some of my scrapbook pages after I put photos on them was because I didn't like the photos. Don't get me wrong, I loved the memories they showed but artistically, something wasn't right. I picked up a photography book and started reading. After finishing that book, I started dreaming and asked for a DSLR for Christmas (even though I already had two other cameras; this might be one reason hubby doesn't "get" my scrapbooking addiction). I then treated myself to a "Dummies" book for the camera I got. I'm still not halfway through it as I'm trying to absorb everything in it but I must say I am liking the results I'm getting so far. I'm even contemplating taking a couple classes to get some hands on training but we'll see. Here are some of the photos from our July 4th celebration of the kids:


These are untouched photos as I have to read the book about the editing software too but it will all come together soon enough. Learning is never ending and my scrapbook pages are reaping the benefits!

I'll be posting some layouts I've been working on soon, so stay tuned!