 |
| Crop Room is set up for 4 guests plus myself to teach. |

Showing posts with label organization. Show all posts
Showing posts with label organization. Show all posts
Monday, June 20, 2011
My Crop Room
In my effort to make my house (and life) more efficient, I have moved my crop room (again!). I have used it a few times now since I've put it into it's current configuration and I think I like it. There is always something more to do, but it works for me for right now. Here are some pictures. I had a free crop today for my customers, a Workshop on the Go class on Thursday and my hubby took a photo of me after I set the room up (I just had to test it out!). The space is such that I can work while my son plays or watches a movie or I can have up to 6 people in the room with kids or if all the kids will be outside or upstairs, I can have A LOT more guests. Check it out and if you are interested in coming to a crop, check out my Events tab for upcoming dates - hope to see you soon!
More pictures after the jump...
Saturday, April 30, 2011
This company is AMAZING!!!!
I have such a creative high right now! I have the awesome privileged to be in a unit of such amazing and talented consultants - I love what I do and as I get to know more of the wonderful ladies (and men) attached to CTMH I love getting to know every single one! One of my uplines in CTMH is Kathy Markloff. She has been with the company 20 years (and has all the Idea Books to prove it!!). Corp allowed only 5 top directors to host regional training events called LeaderShare. This is the first time for the events and Kathy was selected as one of the directors to have an event. Thankfully she lives in the same region I do (yea!) so it was a no-brainer for me to go. The cost of the event was so reasonable and the product we received to use during our creative time (*remember, this is a training event for us so of course we have to do some creating!*) far outweighed the price we paid to attend. I actually had the stamp sets in my arsenal already so I now have some additional sets to sell (bonus!) plus I got to learn and use some new-to-me products. Enough talking, pictures are worth a thousand words so here are some pictures to show you my day:
While we were there, some of the Corp execs dropped by to teach us Business Classes. Christine David spoke about goals and the importance of play. Brian showed us how to go from basic to advanced in our Studio J class in the afternoon. I learned so much! There are definitely things for me to work on but it was nice to sit and just play too! Here are the projects we did at our Creative Training:
And as with anytime this many creative people get together, there is always something being swapped - here is a picture of the card I made:
This is a picture of all the other items I got in the swap (Because I don't have permission to showcase someone else's work on my blog, the photo is purposely far away):
This was my fabulous day - being a consultant, if only to pay for my own habit with a great discount on products I already buy, is so much fun! I get to play every time I go to work and I love what I do! If you want more information on how you can have this much fun too, please stay tuned! CTMH has something WONDERFUL in store for you in the month of May!
 |
| Kathy Markloff |
 |
| Joyce Houck had little goodie bags for her "Shining Stars" |
 | |
| This was the largest group for LeaderShare |
 |
| This is a cute gift idea: Our My Creations Cube using Mayberry paper pack. |
 |
| A 2 page layout using paper from "Wings" (green) and "Bliss" (tan). |
 |
| 6 x6 card using "Friendship", February's Stamp of the Month |
 |
| My swap collection: three layouts, 5 cards & two gift holders (plus my creation) |
Sunday, March 6, 2011
Tutorial: Jewelry Frame
I've been browsing other blogs and noticed something they have that I don't: tutorials. So, I am going to try one. I should do one on a scrapbook page or a card but I've been wanting to do this project for awhile so this is what you get! :)
 First step is to gather your supplies. For my project, I had a picture frame, fabric square, double sided foam tape, utility scissors, cork squares and (not pictured) double sided adhesive.
 If your picture frame came packaged in cardboard, keep it to protect your work surface. Disassemble the picture frame and put the glass in a safe place. You won't need it for this project.
 Using the back of the frame for measurements, layout the cork squares. My squares were 12" and my frame is 16" x 18" so I will have to trim the cork.
 I have a pair of kitchen utility scissors that come apart for cleaning but you could use a box cutter or even a steak knife.
Cut a score line in the cork along using your cutter.
 Carefully fold the cork along the score line to break. Trim all pieces to fully cover the back of the picture frame.
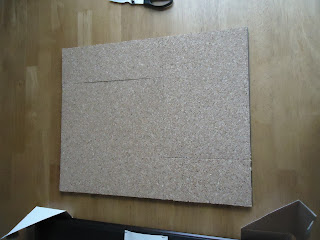
This is how my cut cork squares were arranged. I only needed to use a total of three of the squares. I put all the nicely finished edges towards the outside edge and any sides there were cut and scored towards the inside to create clean lines at the edge of the frame.
 If you haven't done so already, iron your fabric square. I didn't wash mine because I wasn't going to sew with it or wash it after the project was completed so I didn't have to worry about shrinking. Lay the fabric RIGHT SIDE DOWN and center your cork squares on top.
 Put strips of the double sided TAPE down all over the cork. I made sure to lay strips across a cut edge to help keep the squares from shifting during the process.
 Fold the edges of the fabric over and adhere to the tape. Make sure to pull the fabric so it's not loose. If you care how it looks, leave the corners undone and I will show you how to "miter" the corners. If you don't (it's the back, who's going to see it?) then you can skip ahead a few steps.
 This is a quick and dirty miter so don't be intimidated! I stuck a strip of double sided tape across the corner near the edge of fabric on the cork square.
 Then, I pinched the corner and pulled it tight across the cork square. Adhere the fabric to tape strip.
 Using the foam tape squares, stick them all over the back of the cork. Use as much as you want, but keep it from the edges (I didn't and it made the next step difficult and rather painful). About 2" from the edge should suffice.
Lay the picture frame back on top of the foam tape covered cork and adhere.

Place the frame backing into the frame and secure. This is the step where if you have those little swinging clips on the back, you'll need some give in the cork to get the clips in place. The cork is thicker than a picture, matting and glass but not my much. Even with my foam tape right at the edge, I got the clips to slide it but it took some work with a screwdriver to do it. I'd rather save you the agrivation!
 This is what mine looks like all assembled. While working with the fabric, I liked the wrong side of the fabric better than the correct side and it worked better in my room. What do you think?


Cut a score line in the cork along using your cutter.


This is how my cut cork squares were arranged. I only needed to use a total of three of the squares. I put all the nicely finished edges towards the outside edge and any sides there were cut and scored towards the inside to create clean lines at the edge of the frame.

 Put strips of the double sided TAPE down all over the cork. I made sure to lay strips across a cut edge to help keep the squares from shifting during the process.


Lay the picture frame back on top of the foam tape covered cork and adhere.

Place the frame backing into the frame and secure. This is the step where if you have those little swinging clips on the back, you'll need some give in the cork to get the clips in place. The cork is thicker than a picture, matting and glass but not my much. Even with my foam tape right at the edge, I got the clips to slide it but it took some work with a screwdriver to do it. I'd rather save you the agrivation!


All done and hanging in my room. My son asked me what I was doing and disappeared when I told him. When he came back, he handed me the dress up beads and told me to hang them too! His addition is the red Mardi Gras beads on the bottom.
This concludes this evening's edition of my blog tutorial. I hope you've enjoyed your time and I hope you come back again! If you decide to make one, post a picture of it here to share!
Subscribe to:
Posts (Atom)