Showing posts with label Joyful Stars. Show all posts

Sunday, August 9, 2015

August Joyful Stars Blog Hop: Coffee Time!

Hi all!

Welcome to the August edition of the Joyful Stars Blog Hop. We are in the "Sneak Peek" month of the soon-to-be-unveiled Annual Inspirations and there are a few new products to share with you! If you've come from Marie's blog then you're on the right track. If not, just start here and follow the links till you've seen everything. If you get lost you can visit Joyce's blog for a complete list.

The Artistry Cricut Collection is quickly becoming my favorite cartridge ever!! There are so many on-trend images on this cartridge that I can't make cards fast enough! The card I made to share with you will be my Teacher's gifts for my kids' teachers in a few weeks because it is just so cute.


I used the "5" key using the icon and shift functions. I cut the card to 5" (tall) so it would fit into a 5x7 envelope to make it easy to mail. I used Colonial White for the base and a sheet of the new Paper Fundamentals as the cup and Desert Sand for the cozy. The gold heart is a special sneak peek from an item available in September (Shh!) Used a journaling pen to hand draw some fun designs instead of inking edges. The two sentiments come from the stamp sets included with the cartridge and I stamped them in the new Sapphire ink.


Now you're off to Lori's blog to see the fun she's cooked up. See you next month!
Thursday, July 9, 2015

Joyful Stars Blog Hop: Pathfinding Card Kit


Hi All!


Welcome to July's edition of the Joyful Stars Bog Hop. If you're coming from Marie's blog then you're on the right track. If you're starting here,  follow the links at the end of each post to circle 'round until you come back to where you started. If you get lost, you can go to Joyce's blog for the complete list. 


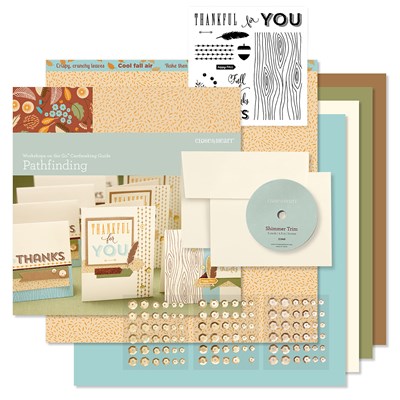
Currently I am in sunny California soaking up all the sunshine at CTMH's annual Convention! But with all my preparation before I left, I wanted to share with you one of my saving grace's: the Pathfinding Card Kit. This kit came in *very* handy for me this week. Even as a seasoned scrapper, I needed the convenience of this beautiful kit.


It always seems like I need thank you cards when I haven't been making them, and this past week was no exeption. I needed more than I had on hand. Cue the music! I rummaged through my stash (because we ALL have a stash!) and found this gem, unopened. I don't usually buy kits because - hello! I can do it myself. Famous last words! I remember buying this because I really liked the stamp set that came along with it. I loved the large stamp with the wood grain. I could do so many things with that stamp, I thought. Needless to say, it sat unopened most of  the year. *sigh*


The card kit makes 15 cards total, 3 styles of 5 cards each. The stamp set and card designs are all exclusive to the card kit and it's very easy to cut and assemble with the included instructions. I made this kit in about 30 minutes, with help from my two little helpers. I then sent out most of them in the mail that day. Thankfully, I had enough to start my stash again, so hopefully, I won't run out soon. :) Unfortunately, I didn't take a photo of all the cards before I sent them out - oops! But here's one that shows how easy and beautiful they turn out to be! ;)


Now you're off to Lori's blog to see her pretty creation. See you soon!

Monday, March 9, 2015

March Joyful Stars Blog Hop

Hi all! Welcome to another blog hop with the Joyful Stars!

I'm fresh off two weekends in two months of scrapbooking crops so I have some new stuff to show you over the next few weeks! If you're coming from Nickie's blog then you're on the right track. If you get lost along the way,  so at Joyce's blog for the complete list.

I shared this layout with you back in September but didn't have any photos or embellishments on it. Here it is again but all dolled up.

Now you're of to Jolene's blog. See you next month!

Monday, February 9, 2015

February Joyful Stars Blog Hop

Hi all and welcome to the February edition of the Joyful Stars blog hop!

If you came here from Betty's blog then you're on the right track. If you're starting here then just follow the link at the bottom of the post to hop over the next blog. So grab your coffee and enjoy the eye candy!

It's been awhile since I've created anything but I finally got away last weekend to a winter scrapbooking retreat and created some lovely layouts that I'll be sharing with you over the next few weeks but the first layouts I want to share are two, single pages I did to try out a new (to me) technique: scrapbooking only one photo per page.

I've seen these pages all over the magazines and I'm really too much of a shutterbug to ever think about this technique until I get to my retreat and realize that I have two single photos of two different events. Seems like the perfect time to try something new!


CTMH Chalk It Up with lagoon shimmer tape, Chalk It Up accessories and white enamel stars
 I used the Chalk It Up paper pack (which by this time is just scraps), the matching Chalk It Up accessories, Lagoon shimmer tape and white enamel stars. I inked the edges of all the paper with Lagoon ink and colored in the enamel stars with Bronze Shin Han marker.

CTMH Chalk It Up with lagoon shimmer tape, Chalk It Up accessories and white enamel stars
 I love this picture because my husband is actually *smiling* !!!
CTMH Chalk It Up with lagoon shimmer tape, Chalk It Up accessories and white enamel stars
 The other page I'm going to share with you is made using the Paper Fundamentals, Avonlea Picture My Life cards, sparkle flourishes and the twill ribbon.

CTMH Paper Fundamentals, Lagoon ink, Avonlea Picture My Life cards, sparkle flourishes & twill ribbon
I used the Lagoon stamp pad to color in the paper (carefully wiping the ink off the resist pattern) then adhering the Picture My Life cards in a pretty pattern and adding the flourishes and ribbon.

 (Sorry this is turned, I can't get Blogger and my photo editor to stop over-thinking each other)
CTMH Paper Fundamentals, Lagoon ink, Avonlea Picture My Life cards, sparkle flourishes & twill ribbon
Thanks for stopping by and leaving a comment (hint, hint). Now you're off to Marie's blog to see what she has for you. See you soon!

PS If you get lost along the way, check out Joyce's blog for the complete list.

Sunday, November 9, 2014

November Joyful Stars Blog Hop: A Christmas Card

Hi and welcome to the November Joyful Stars Blog Hop. It's a circular hop so no matter where you start just keep hopping till you come back again. If you get lost you can find the list at Joyce's blog. If you're coming from Krista's blog, you're on the right track.

I'm trying to get a jump on the holidays this year so I'm posting a Christmas card. My kids were at the table "helping" me so it's not the most complicated design ... but there's something elegant about it anyway!


The stamp set is a Hostess Reward set so make sure you talk to your Consultant to find out how you can get this exclusive set! To make the card, I used White Daisy and Lagoon cardstock with Lagoon & Silver (non-CTMH) inks with Lagoon twine (retired).

I used second generation stamping on the angel for a subtle effect.

Now you're off to Crystal's blog to see what she's created. See you next month!

Wednesday, April 9, 2014

April Joyful Stars Blog Hop: Studio J

Welcome back to another edition of the Joyful Stars Blog Hop. If you're coming here from Cindy's blog then you're on the right track. It's a circular hop so if you get lost you can always visit Joyce's blog for a complete list.

This last month has been an extremely hard month for me but Close to My Heart had a fabulous deal all month long on Studio J layouts that I didn't want to miss out on. If you haven't tried Studio J, then you owe it to yourself to a take a half hour to make a beautiful layout - with or without pictures. There is so much to do on Studio J and this month I sat down and tried a bunch of techniques I've heard about from other consultants. I'm going to share my efforts with you now.

This is beautiful paper but I just didn't love it in person. On the computer screen, I fell in love with it! I loved that I could change the embellishment and cardstock colors to whatever I wanted and boom! I loved it! See that word collage on the right? I made that! The Stickease says "Be You" then using the individual letters, I added "TIFUL" below to it make it a title. Sweet, huh?
Studio J "Be-You-Tiful" layout from LavendersageDesigns.blogspot.com featuring Arianna


Just a few of the options to Studio J to help you think outside the box:

1. Create beautiful, quick pages with predesigned layouts, complete with photos, journaling and embellishments:

Studio J layout from LavendersageDesigns.blogspot.com featuring Jubilee

Studio J layout from LavendersageDesigns.blogspot.com featuring Lollydoodle
 2. Create beautiful, quick layouts with predesigned layouts (waiting for your own photos and embellishments):

Studio J layout waiting for photos from lavendersagedesign.blogspot.com

3. Print your photos!!! Seriously, this one hit me like bricks when I learned this was an option!
The best perk to being a consultant is getting to go to Convention each year. In 2013, CTMH had our annual convention in Disney World Florida! It. Was. Awesome! During one of our creative sessions they gave us an exclusive paper pack just for attending then showed us new layout designs to help us scrap our time at Disney. These photos are just a few of the highlights of my trip that I am printing using Studio J to fit onto the pages I've already made up. Quick and easy!

Use Studio J to print your odd size photos from lavendersagedesigns.blogspot.com

4. But wait! There's more!!!
I don't have examples of this to share with you, but want to tell you about them anyway. Picture My Life is a great way to quickly put a bunch of photos into a layout and now you can make you're own PML cards in Studio J. Want to use Arianna? Or  Lollydoodle? Now you can!! Simply choose the paper pack you want to use and the card sizes you want to use (3x4 or 4x6) and start designing. This is the project I'm currently working on now!

I will post more from my Studio J haul in other posts since they use retired paper packs. If you want to see them, make sure to follow my blog (click the link on the right sidebar) so you don't miss a post. Thank you!

Thanks for joining me as you travel this blog hop. Please take a moment and leave a comment as you travel. Now you're off to Lori's blog to see what she has to share. See you next month!!

Monday, December 9, 2013

Joyful Stars December Blog Hop

Welcome to the Joyful Star Blog Hop for December! If you're coming from Krista's blog you're on the right track. It's a circular hop so if you're just starting here then you can just go 'round till you end up here or you can check out the whole list on Joyce's blog.

My projects for this month's hop are the table decorations I made with the Art Philosophy Cricut cartridge.

For Thanksgiving, I used the cartridge to make little turkeys for each plate. Darling, huh? And so simple!!!


I cut leaves at 2 1/2" from 3 colors of cardstock and the center image from CCR to get it to the right size (sorry, I don't know what it ended up being because I didn't save it, darn!)


For my church's Women's Christmas Coffeehouse, I used the Art Philosophy cartridge and cut ornaments out of black cardstock. 


I then used white pigment ink to messily sponge the edges to resemble the chalkboard effect so popular right now. 


I used some baker's twine to tie off the tops and the Chalk Marker to write the dishes the ladies brought to share so we could tell the onion dip from the spinach dip (which look eerily similar sitting next to each other on the table...).


Thanks for stopping by! Now you're off to Helen's blog.

Saturday, November 9, 2013

Joyful Stars Blog Hop: Huntington for Christmas

Welcome to the Joyful Star Blog Hop for November! If you're coming from Krista's blog you're on the right track. It's a circular hop so if you're just starting here then you can just go 'round till you end up here or you can check out the whole list on Joyce's blog.

As I was working on my Huntington WOTG I had a few pieces left over so I thought I would make a layout for our Christmas Eve pictures. I chose the Make It From Your Heart vol 2 layout pattern #12. ( I did make it my own to fit the photos I wanted to use.)


 I used the Glitz gel in Silver, Green, Almond and Red to embellish this stamped image in the corner of the layout.


I stamped the swirls image three times then embellished with the Glitz gels and pop dotted the tree also embellished with the red Glitz gel. I had fun playing with the Glitz instead of other embellishments and once left sit overnight to dry were a fun way to dress a layout up.

Now head on over to Nickie's blog. See you next month!


Monday, September 9, 2013

Joyful Stars Blog Hop: Base & Bling


 photo JoyfulStarsBlogHopBadge3_zpsa824a544.jpg

Hello and welcome to the September Joyful Stars Blog Hop featuring new products from the Autumn/Winter 2013 Idea Book. 

If you came here from Krista's Crafty Corner you're on the right track.  It's a circular hop, so if you're starting out here  you can keep going 'round till you come back again. 

I used our new Base & Bling collection to make headbands for me to wear. I bought a pretty fall cardigan in a color I would never pick out for myself except I saw it on a friend of mine and loved it. Once I got it home I realized I had no accessories to go with it, so I headed to my scrapbooking room to solve my problem. 


I used the Chocolate Striped Ribbon, the Honey fabric from the Sarita Textiles and a glitz button from the Babycakes Assortment.

Using a needle and thread, I made a running stitch along one side of the ribbon cut to 18". Pulling both ends of the thread curled the ribbon on itself to make the flower. I tied the thread to keep it together. Then I did the same thing with the Honey fabric cut to 1" x 12". Going through my Babycakes Assortment I wanted to use a button with a Slate jewel and chocolate button but I didn't find one (or I used it on another project) so I colored the wood button with the chocolate marker. I then hot glued the ribbon, fabric and button together and let it cool. Once cool, I used an adhesive jewel dot to attach to the headband. 

All together, the project took me about 20 minutes to figure out and assemble (I'm learning the sewing stuff as I go so you'll be quicker than I was!) and it looks so adorable on! 

I'm making more, one for each outfit! It's a quick and fun way to use up my scrapbooking supplies!

Now you're off to Helen's Blog!

Friday, August 9, 2013

Joyful Stars New Product Blog Hop: Babycakes

Hello and welcome to the August Joyful Stars Blog Hop featuring new products from the new Idea Book. 

If you came here from Nickie's blog you're on the right track.  It's a circular hop, so if you're starting out here  you can keep going 'round till you come back again. There is a list of participants at the bottom of the post if you want to skip ahead. 

I've been working on this layout in my head for awhile because I started with the right page from the Idea Book but since it's from the Reflections How-To Program book and doesn't suggest a left side page design, I had to work on it myself. *sigh* I really like how CTMH does all the planning work for me, so having to design something myself is time consuming... but I suffered through and after about the third sit-down, I finally have something I like. 


I wanted to use the same pattern but vary the sizes of the squares to make it stand out but it wasn't until I decided to use an 8x10 photo mat did the layout come together.


I enjoyed using some of new Irristables Hexagon shapes, very easy to ink up and stick to the page.


The new cork shapes are fun to use, they come in lots of shapes and sizes and given that they already have adhesive makes it super easy. Just peel and stick!


I also tried a new-to-me technique - sewing! I finally got my sewing machine fixed (okay, the problem was really the user but I got that fixed but finding a good instructor!) and I've been playing! I am thrilled with how easy it is to add a little panache to the page with some stitches. I will be experimenting with some of our stitches stamping sets so stay tuned for some more on this topic!

The blank spot on the left side is where I will place the date of the photos when I finally decided which ones to use. For now, my scrapbooking style is to make the page then find photos to fit. I have so many photos to preserve from the last many years that I can't work in any order at this point. 

Now you're off to Hellen's blog!

Here is a list of participants  so you can pick up anywhere. These are direct links to their blog hop posts (unless noted) so if you're tuning in late, you'll be on track. Feel free to visit each blog and check out all that they have to offer!

Tuesday, July 9, 2013

July's Joyful Stars Blog Hop

Hello and welcome back to the second month of the Joyful Stars Blog Hop!

If you came here from Crystal's blog you're on the right track. It's a circular hop, so if you're starting out here  you can keep going 'round till you come back again. I posted a list of participants at the bottom of the post so you can pick up anywhere but please note that these links take you directly to their blog not the blog post so if you're tuning in late, you'll have to hunt a bit (though I'm sure you'll enjoy the search!).

Since I've been busy with vacations, vendor shows and convention I haven't had much time to create anything I can show you (but come back next month and I'll have loads to share!) so I searched through my albums till I came to a layout I haven't shown you yet.


I used the Later Sk8r paper pack (only available till the end of the month, *sob*) and stickease to make this layout (it is part of the Workshop on the Go) and I used photos from June 2012 Transport for Christ Regional Truck Show in Lebanon PA. I love this paper pack because of the diamond-plating pattern is all over my photos anyway - this ties my photos to the paper very well! The stickease and WOTG stamp set were perfect to stock up on because this is one set I will use over, and over, and over again! There simply is no shortage of truck pictures in my albums!


Now you are off to Helen's blog. See you next month!


Joyce Houck             Joyce-joyfulcreations.blogspot.com

Nickie Hoffer            nickiehoffer.blogspot.com

Nancy Brown            creativelyartsygallery.blogspot.com

Lori Meadows           CraftyMeadows.blogspot.com

Stephanie Brown       stephanielovesscrapbooking.blogspot.com

Heather Flaherty        papercrafteranonymous.com

Crystal Davis             craftingwithcrystal.blogspot.com

Stephanie Huber         lavendersagedesigns.blogspot.com

Hellen Gullett               byheleng.wordpress.com

Elizabeth Mindemann   ejoym.blogspot.com

Krista Hershberger     Kristascraftycorner.blogspot.com

Betty Locco                scrapbookgirl2.blogspot.com

Jean Murphy               stampandscrapjeanie.blogspot.com

Cindy Leek                 savingmemorieswithcindy.com

Meredith Hainsworth    craftyschemings.blogspot.com.

Sunday, June 9, 2013

Joyful Stars Blog Hop: Anything Goes: Mother's Day Card

Hi and welcome to the new Joyful Stars Blog Hop. Each month this blog hop will have a different theme and this month Anything Goes! All projects will feature Close to My Heart products which you can obtain from your consultant. If you don't have a consultant contact any of the participants in the blog hop (pick me! pick me!) for more information.

If you've come from Crystal Davis' blog, you're on the right track. This is a circular blog so jump in here and follow it till you come back.  For a complete list of blogs participating, check the bottom of this post.

If you're new to my blog - welcome! Stay and look around before jumping on to the next blog (or Follow me so you can see my new posts). I look forward to getting to know you!

My entry today is the card I made for my mom for Mother's Day.


 I mixed my paper packs {gasp!} and used "For Always" and "Chantilly" scraps with black and white daisy cardstock. I used "Perfect Fit - Mom" stamp set and black and Blush ink. I used the 2 1/2" scallop punch to make a scalloped circle that I sponged the edges in blush ink. I stamped the outside image in black ink and the "MOM" in blush. CTMH's clear acrylic stamps and blocks make it so easy to line up multiple images the first time!

I layered my scraps using a 1/8" border based on the smallest scrap I had so no fancy measurements on this one. A simple, quick card I made with scraps I had on hand. And because it's handmade, it's made with love! All for the "World's Greatest Mom" - mine! :)

If you're following the blog hop, you're off to my friend Elizabeth's blog - you'll love her! See you next month!

Joyful Stars Blog Hop Complete Listing 
(these are links to their blogs not to their blog hop posts)

Joyce-joyfulcreations.blogspot.com                                     
              Joyce Houck
Kristascraftycorner.blogspot.com                                       
               Krista Hershberger
nickiehoffer.blogspot.com                                              
                   Nickie Hoffer
creativelyartsygallery.blogspot.com                                    
               Nancy Brown
stephanielovesscrapbooking.blogspot.com                                
         Stephanie Brown
craftingwithcrystal.blogspot.com                                       
                 Crystal Davis
lavendersagedesigns.blogspot.com                                       
             Stephanie Huber
ejoym.blogspot.com                                                     
                     Elizabeth Mindermann
scrapbookgirl2.blogspot.com                                            
                  Betty Locco
stampandscrapjeanie.blogspot.com                                       
             Jean Murphy                
              Meridith Hainsworth
           Helen Gullett