Showing posts with label stamped card. Show all posts

Thursday, July 9, 2015

Joyful Stars Blog Hop: Pathfinding Card Kit


Hi All!


Welcome to July's edition of the Joyful Stars Bog Hop. If you're coming from Marie's blog then you're on the right track. If you're starting here,  follow the links at the end of each post to circle 'round until you come back to where you started. If you get lost, you can go to Joyce's blog for the complete list. 


Currently I am in sunny California soaking up all the sunshine at CTMH's annual Convention! But with all my preparation before I left, I wanted to share with you one of my saving grace's: the Pathfinding Card Kit. This kit came in *very* handy for me this week. Even as a seasoned scrapper, I needed the convenience of this beautiful kit.


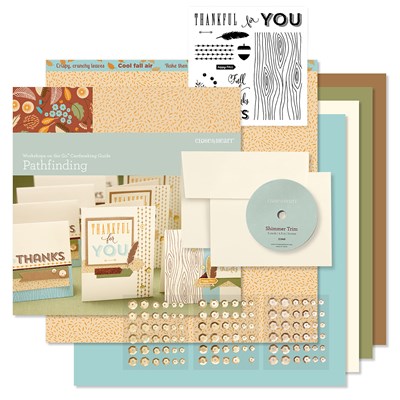
It always seems like I need thank you cards when I haven't been making them, and this past week was no exeption. I needed more than I had on hand. Cue the music! I rummaged through my stash (because we ALL have a stash!) and found this gem, unopened. I don't usually buy kits because - hello! I can do it myself. Famous last words! I remember buying this because I really liked the stamp set that came along with it. I loved the large stamp with the wood grain. I could do so many things with that stamp, I thought. Needless to say, it sat unopened most of  the year. *sigh*


The card kit makes 15 cards total, 3 styles of 5 cards each. The stamp set and card designs are all exclusive to the card kit and it's very easy to cut and assemble with the included instructions. I made this kit in about 30 minutes, with help from my two little helpers. I then sent out most of them in the mail that day. Thankfully, I had enough to start my stash again, so hopefully, I won't run out soon. :) Unfortunately, I didn't take a photo of all the cards before I sent them out - oops! But here's one that shows how easy and beautiful they turn out to be! ;)


Now you're off to Lori's blog to see her pretty creation. See you soon!

Tuesday, October 14, 2014

Scaredy Cat, Day 3

Here is the last of the cards I made with the Scaredy Cat paper pack scraps:


I recently found out about "Inchie" cards and then saw this template in the MIFYH book. I added some Thistle ribbon and Sunset Mini Medley brads and buttons (retired). The stamp set is Trick or Treat Sweets.


Monday, January 27, 2014

January Stamp of the Month & a Valentine's Day card

It's not often that I get around to working with one of CTMH's Stamps of the Month during the month it's on sale but this stamp set has spoken to me on many levels. I originally bought it because of the sewing aspect - I know a lot of sewers and knew this would be a much-used set to send those lovely ladies happy tidings. Then I started seeing how other consultants were using the set - for Valentine's Day! - and I have to say, I honestly never saw that use in the stamp set, but I love it!

I had a team meeting yesterday afternoon and originally planned to make a card with the stamp set but since we talked too much (*cough, cough*) we didn't get around to it. So I'm posting it here so I'm going to share with you too.


I used Whisper cardstock to make the base, with the fold on the left. I used Sparkle & Shine B&T and Ruby cardstock. Accessories are: foundry pins, sparkle gems and baker's twine. I used Whisper ink on the edges of everything and Ruby ink on the sentiment.

The second card I'm going to share today is an elegant Valentine's Day card using Whisper cardstock and Sparkle & Shine B&T.


 I used Whisper Ink on the edges and the sentiment and pearl pins stuck in foam tape between the layers. I used Artiste to cut the fancy shape in Whisper and White Daisy. The sentiment is from "4 My Friend".


Stay tuned because I have been really busy working on projects from the new Idea Book. I'm toying around with having another virtual Open House. Would you be interested??? I just love this Idea Book and all the lovely goodies inside - and I know you will too! Please comment on this post and let me know if you'd like to see my Online Open House on February 1 & 2.  Thanks!!!

Sunday, June 9, 2013

Joyful Stars Blog Hop: Anything Goes: Mother's Day Card

Hi and welcome to the new Joyful Stars Blog Hop. Each month this blog hop will have a different theme and this month Anything Goes! All projects will feature Close to My Heart products which you can obtain from your consultant. If you don't have a consultant contact any of the participants in the blog hop (pick me! pick me!) for more information.

If you've come from Crystal Davis' blog, you're on the right track. This is a circular blog so jump in here and follow it till you come back.  For a complete list of blogs participating, check the bottom of this post.

If you're new to my blog - welcome! Stay and look around before jumping on to the next blog (or Follow me so you can see my new posts). I look forward to getting to know you!

My entry today is the card I made for my mom for Mother's Day.


 I mixed my paper packs {gasp!} and used "For Always" and "Chantilly" scraps with black and white daisy cardstock. I used "Perfect Fit - Mom" stamp set and black and Blush ink. I used the 2 1/2" scallop punch to make a scalloped circle that I sponged the edges in blush ink. I stamped the outside image in black ink and the "MOM" in blush. CTMH's clear acrylic stamps and blocks make it so easy to line up multiple images the first time!

I layered my scraps using a 1/8" border based on the smallest scrap I had so no fancy measurements on this one. A simple, quick card I made with scraps I had on hand. And because it's handmade, it's made with love! All for the "World's Greatest Mom" - mine! :)

If you're following the blog hop, you're off to my friend Elizabeth's blog - you'll love her! See you next month!

Joyful Stars Blog Hop Complete Listing 
(these are links to their blogs not to their blog hop posts)

Joyce-joyfulcreations.blogspot.com                                     
              Joyce Houck
Kristascraftycorner.blogspot.com                                       
               Krista Hershberger
nickiehoffer.blogspot.com                                              
                   Nickie Hoffer
creativelyartsygallery.blogspot.com                                    
               Nancy Brown
stephanielovesscrapbooking.blogspot.com                                
         Stephanie Brown
craftingwithcrystal.blogspot.com                                       
                 Crystal Davis
lavendersagedesigns.blogspot.com                                       
             Stephanie Huber
ejoym.blogspot.com                                                     
                     Elizabeth Mindermann
scrapbookgirl2.blogspot.com                                            
                  Betty Locco
stampandscrapjeanie.blogspot.com                                       
             Jean Murphy                
              Meridith Hainsworth
           Helen Gullett  

Wednesday, March 27, 2013

You + Me card

This the first of two cards I submitted in my application. It is a card I made for my Valentine's Day class featuring the "Whooo's Your Valentine" stamp set. I chose a variety of colors to stamp the heart and used Gray Wool (retired) to stamp the sentiment. So easy! It took longer to arrange the colors in rainbow order than to make the card, but that's what I get for asking my (almost) 5 year old to help!


Thursday, November 22, 2012

Happy Thanksgiving

Happy Thanksgiving!

Today is a day to celebrate all that we are blessed with and to give thanks to the One who gave it to us. Even when times are tough, there is much to be thankful for. I pray continued blessings to you and your family.

Here is a quick craft I did with my son and his cousins this week for them to hand out to friends.


I used CTMH Kraft paper, cut to 4" x 4" squares, cocoa cardstock cut with the 2" scallop punch and cocoa, cranberry, honey, sunset & olive inks.

I had each of the kids use their thumbs in the cocoa ink to make a thumb print on the cocoa scallop then had them use each finger in the remaining colors to make the "feathers" before adhering the scallop circle. Using CTMH's new chalk marker, they made two eyes on the thumbprint and drew two feet with the Honey marker (retired). Each card took less then two minutes and the kids were able to complete a whole line of them with little help. And did they like getting messy! I should have taken pictures but I was following them quickly to the bathroom to wash hands! But not to worry, since CTMH's inks are waterbased, they are very easy to clean up. I used our stamp cleaner on the furniture where I saw multi-colored finger prints and it came right up. I stamped the sentiment at the top of each card and they wrote their names on the back.

Happy Thanksgiving!

Friday, September 28, 2012

87 Days till Christmas

Have you started designing your Christmas cards this year? It's closer than you think! Less than 90 days to go and what have you done? Keep reading for some designs sure to spark your creativity.

Monogram stamps aren't just for initials. Designer: Krista Hershberger

Make a tree out of ornaments. Designer: Nickie Hoffer

Emboss a few stars to create some twinkle in your card. Designer: Nickie Hoffer

A subtle image portrays the true meaning of Christmas. Designer: Krista Hershberger

Artiste Cricut cartridge can create some wonderful, out of the box cards. Designer: Gennette Feagan

Artiste makes an basic card anything but boring. Designer: Gennette Feagan

Wednesday, September 26, 2012

Christmas Card Workshop

I'm still recovering from my awesome weekend! I love papercrafting and the only thing that makes it better is getting to do it with friends. This past weekend was a lot of work to pull off but having so many great friends to do it with makes it worth all the extra effort. Here are a few photos of the day:

This is my "grandmother" Krista. Check her blog out at kristascraftycorner.blogspot.com

This is my "mother" Brenda Rutt teaching a group of ladies. She is a popular teacher at this event!

The best way to decorate a tree is with some handmade items! These are examples of cards we've made other years.
But I know you're really interested in the cards we made. Here are a few and I'll share the rest on Friday.

This one isn't a card but it is made with the new Artiste Cricut cartridge from Close to My Heart. Designer: Gennette Feagan.

Add any pretty flower to Christmas-y paper to have a great twist on the holiday. Designer: Sherri Reiff

Frosty Friends and Avonlea make a lovely card. Designer: Krista Hershberger

Dakota paper makes a great rustic background for a symbol of winter. Designer: Martha Zook

Peace is a constant theme throughout the holidays. Designer: Katie Fisher

A little sparkle lights up the Christmas tree. Designer:  Brenda Rutt

Thursday, March 8, 2012

Secret Sister Gift

This is the gift I made for my Secret Sister in my Mom's Group. She might figure this out if she knows me, but we'll have to wait and see!

 All wrapped up!
 She will get 4 of these blank cards.
She will get 4 of these 3"x 3" gift cards.

Tuesday, March 6, 2012

Baby Cards

I guess it must be in the water! When I found out I was pregnant this time, half my friends also turned up pregnant! Now, we're all getting ready to welcome our little bundles so I am using my down time to get ready - I know I won't have time soon enough to work in my craft room. Here is the card I made - same design, different colors. Love it!


Friday, March 2, 2012

When Creativity Flows

Sometimes creativity just flows. When it does, it can be hard to keep up! Here are a few cards I made recently. First, you'll recognize this one from my last post:

I really liked the flourish (February 2011 Stamp of the Month) so I decided to see what else I could do. Here's what I came up with:

This is a very simple card with just chocolate ink to decorate the card. Simple and straight forward.

This is a fast card to welcome a little girl. The sentiment is from Card Word Puzzle and the little feet are from a retired set from many years ago.

Same stamp, different cards and still very fast and impressive. What's easier?

Friday, December 23, 2011

Here is another card my upline, Krista Hershberger, designed for a team meeting back in November. It uses the November stamp of the month and Dreaming paper pack. I love how the bronze Glitz gel sparkles up the ribbon. Make sure to check out her blog!


Thursday, December 22, 2011

And last but not least...

Here is the last card we did at our Christmas Card Workshop back in September. Stephanie Z designed this great card using my favorite new stamp set "Remarkable Wreath". Great job, Stephanie!


Wednesday, December 21, 2011

I have such talented uplines and I am awed by their creativity. My second upline, Krista Hershberger, was in charge of the Christmas Card Workshop back in September and aside from planning an awesome day for 14 consultants and 40 guests (and their kids!) she designed three awesome cards.  Here are her creations. Please make sure you check out her blog too. She posts a lot of great ideas!


 The last two cards, Krista designed with the Art Philosophy Cricut cartridge and the matching stamp sets. For the workshop, she precut all the design elements for all the guests to show them how fast and simple this cartridge can make your papercrafting. After seeing these designs, I'm a believer!


Tuesday, December 20, 2011

Christmas Cards

It seems that a lot of my busy-ness has come down to one thing - homemade Christmas cards. I struggle with this every year because as a crafter I want to give a homemade card to everyone. Unfortunately, my card list is much longer than I want to make cards for and I never start early enough to make it possible. I also love sending photos of the kids to family and friends and the photo cards are so simple to do. Maybe when I don't have cute kid photos to send each year, I will work on shortening my list down to a managable level (or just start earlier) but for now, I simply save the cards I make in classes for "someday". Over the next few days, I will share with you some of the cards my sister consultants designed for our Team's Christmas Card Workshop back in September. I shared with you the card I designed but here are some of the other designs the guests got to make throughout the day.


Monday, December 19, 2011

Christmas Gift Tags

I am loving how easy the Art Philosophy Cricut Cartridge is making my holiday gift giving this year! I am able to make some really easy gifts that look like a million bucks! Below are some of the gift tags I made to attach to the kids' gifts. I went a little more dramatic for the tags that will go on the adult gifts but for the kids' I kept it simple.
I cut 14 of the tag from the Art Philosophy cartridge in Olive cardstock and 14 of the rectangle from White Daisy cardstock. Using the December 25th stamp set, I used Cranberry ink to stamp the image onto the white cardstock. Super easy!
This the tag I am using for the adults' tags. I cut Barn Red cardstock to 4"x 6", White Daisy cardstock to 3.5" x 5.5". I used Olive ink with an image from the June Stamp of the Month stamp set and some of the gingham ribbon from the red collection. Since the adults actually care who the gift is from, I made it bigger to accommodate all the extra sentiments adults like.

Wednesday, July 27, 2011

While I've been waiting

While I have been (not so) patiently waiting for my new product to come so I can start playing with it, I've been using my time wisely. I am working on organizing my digital photo albums and getting caught up on sorting, tagging, and making copies for friends and family. Here are some of the photos I thought I posted before leaving for convention.

The first three are the roommate gifts I made using the My Creations Journal. I went a different direction with each of them so stretch myself (never a good idea when time is short) but I'm happy with the result.


The next four photos are the cards I did for the card swap. Each year, the consultants swap cards or small trinkets that they've made so imagine 1500 gals swapping cards every time we'd get together - it was so cool to see all the talent and generosity.


I never feel like my work is up to par with other consultants but no one refused an offer to swap and I even had one lady track me down for a card I swapped with a friend of hers - that was a good feeling! ;)

This last one is the business card I did the night before I left. I was all done packing but still had some time to unwind (1am isn't the time to unwind, especially when I had to get up at 5am but I figured I'd sleep on the plane). I also made the little card holder too, I didn't want to take my nice one in case I lost it.

I'll have some new stuff to post soon - in the meantime, enjoy your summer!