Sunday, June 9, 2013

Joyful Stars Blog Hop: Anything Goes: Mother's Day Card

Hi and welcome to the new Joyful Stars Blog Hop. Each month this blog hop will have a different theme and this month Anything Goes! All projects will feature Close to My Heart products which you can obtain from your consultant. If you don't have a consultant contact any of the participants in the blog hop (pick me! pick me!) for more information.

If you've come from Crystal Davis' blog, you're on the right track. This is a circular blog so jump in here and follow it till you come back.  For a complete list of blogs participating, check the bottom of this post.

If you're new to my blog - welcome! Stay and look around before jumping on to the next blog (or Follow me so you can see my new posts). I look forward to getting to know you!

My entry today is the card I made for my mom for Mother's Day.


 I mixed my paper packs {gasp!} and used "For Always" and "Chantilly" scraps with black and white daisy cardstock. I used "Perfect Fit - Mom" stamp set and black and Blush ink. I used the 2 1/2" scallop punch to make a scalloped circle that I sponged the edges in blush ink. I stamped the outside image in black ink and the "MOM" in blush. CTMH's clear acrylic stamps and blocks make it so easy to line up multiple images the first time!

I layered my scraps using a 1/8" border based on the smallest scrap I had so no fancy measurements on this one. A simple, quick card I made with scraps I had on hand. And because it's handmade, it's made with love! All for the "World's Greatest Mom" - mine! :)

If you're following the blog hop, you're off to my friend Elizabeth's blog - you'll love her! See you next month!

Joyful Stars Blog Hop Complete Listing 
(these are links to their blogs not to their blog hop posts)

Joyce-joyfulcreations.blogspot.com                                     
              Joyce Houck
Kristascraftycorner.blogspot.com                                       
               Krista Hershberger
nickiehoffer.blogspot.com                                              
                   Nickie Hoffer
creativelyartsygallery.blogspot.com                                    
               Nancy Brown
stephanielovesscrapbooking.blogspot.com                                
         Stephanie Brown
craftingwithcrystal.blogspot.com                                       
                 Crystal Davis
lavendersagedesigns.blogspot.com                                       
             Stephanie Huber
ejoym.blogspot.com                                                     
                     Elizabeth Mindermann
scrapbookgirl2.blogspot.com                                            
                  Betty Locco
stampandscrapjeanie.blogspot.com                                       
             Jean Murphy                
              Meridith Hainsworth
           Helen Gullett  
Monday, June 3, 2013

A friend's Chantilly card

Back in April I participated in my upline's team swap featuring Chantilly cards. I showed you mine here.

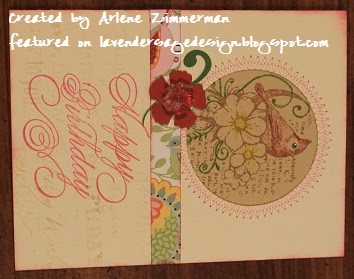
Today, I want to share with you one of cards I received that blows my mind. My friend Arlene Zimmerman created this card and her artistic skills astound me!

Her card is a simple design using a strip of the Chantilly paper with a flower and vine cut using Artiste but what gets me everytime I look at this card is her stitching!


 Arlene used colored pencils to highlight parts of the stamped image in the background to complete the card.


Isn't it awesome?! I love this card and have it hanging on my inspiration board. I would love to try stitching on my artwork but while  I lack a reliable sewing machine right now, I lack the vision of it. I'm hoping once I try it I'll like it and will be able to get more creative as my skills improve. Until then, I look at Arlene's dreamy card.

Special thanks to Arlene Zimmerman for letting me share her card on my blog.

Monday, May 20, 2013

New! My First YouTube Video!

I am attempting to try my hand at something new...

Making YouTube videos!

Check me out on YouTube on my first video.... I'm showing a gift card holder for a card swap I'm doing and doing a tutorial on the 3D flowers from Art Philosophy.


 And let me know what you think in the comments section!!!

{Yes, I know the video is blurry when I move my hands and the sound quality is poor... I'm looking into getting better equipment, but this is what my laptop does for now!}

Thursday, May 16, 2013

Studio J is Even Better!

I don't talk about Studio J too much on my blog because, well, I don't know why. I use it. I love it. I recommend it but I don't talk about it. And that's my fault to you. Studio J is a wonderful addition and alternative to traditional paper scrapbooking. Right now, you're in one of two camps about Studio J: 1) what is it? or 2) it doesn't meet my needs (cost, time, style).

Well, CTMH has done a great upgrade to Studio J that in it's simplicity, has totally made Studio J  THE. EASIEST. DIGITAL. SCRAPBOOKING.  EVER!

Here are two videos that explain how easy Studio J really is.

This video describes Custom Photo Wells:


This video is about Express Collections:


While watching these videos, I think you're as excited about Studio J as I am! I will be printing all my photos this way from now on! No more wishing I had a photo in a particular size as I'm working or printing expensive photos in large sizes I won't use. This is the perfect solution to keeping photo printing costs down!!

Now is a great time to try Studio J - there's no cost to play, no software to buy, no kits to purchase. It's easy to keep up with your scrapbooking with Studio J!

So if you're in the second camp about Studio J - I think you'll see that you can now make your scrapbooking layouts they way you want them to look and a price you can afford. Now is the time to try it for yourself!

Questions about Studio J? Email me and we'll chat. I'll be using Studio J more, will you?

Even better, your Studio J layouts count towards Hostess Credit! Save up your layouts till you have enough for a party and earn traditional scrapbooking supplies for free! Or host a party with your friends and mix and match your purchases to earn Hostess Credit. Or join the "Mystery Hostess" party on my website before you buy your Studio J layouts to be entered into my Mystery Hostess drawing each month.

Saturday, May 4, 2013

Last Day to Buy a Great Bargain

Today's the last day to buy the Ultimate Homemaking eBook Bundle - Retail value of over $600 - for only $29.95!


Here are some graphics of the book covers by category (thanks to blogger Jamie Balmet at the Young Wife's Guide for the graphics!). Check out what books are included here in this post.


This bundle has a value of over $640 and it's only $29.97! But today's the last day!

(I am affiliate of the sale so I will receive compensation if you use any of these links. However, I only recommend what I myself use and love.)

Friday, May 3, 2013

Chantilly Card


I participated in my Team's Chantilly card swap for April and I'm actually quite happy with how it turned out. There are a few things I will add to do it for a class but it's quick, simple to assemble and cheap to mail: everything I look for in a card! *Smile!*


I am seriously in love with the glimmer tape! I am adding sparkle to everything now!


Wednesday, May 1, 2013

Karate Invitations

Little Man isn't so little anymore! On his last birthday, he turned FIVE! OH my, where has the time gone?!

Since I was also planning Missy's first birthday party among some other things, I decided this will be the year we "buy" a birthday party and invite ALL of his friends. I contacted his karate instructor and she (thankfully) already had a program in place. The package included invitations but since I'm just a little bit crafty (ahem) I wanted to do *something* special. It is my kid's birthday, after all.

Searching Pinterest was a great starting point but I didn't find anything that got me excited. So I went to my own drawing board. This is what I came up with and I was so excited to find that I designed and made 25 invitations in just 90 minutes! I am never that fast!


I started with a plain, white envelope. I trimmed about 14" off the left side to create a pocket. Using a black marker, I traced a black line along what would be the the collar of the uniform. I sealed the bottom of the envelope flap and tied a black ribbon around the whole thing. So quick and simple!


I whipped up a quick invitation on the computer to fit the envelope and slid it inside. 


Designed and made in almost no time at all! It was a little expensive to mail because of the ribbon, but thankfully we see our friends often enough that I didn't have to mail too many. A perfect start to a great party!

Here's his favorite part of the party - getting to break a board!


Don't forget about the Ultimate Homemaking eBook Bundle - it's only on sale for a few more days! Get a copy for yourself and one for a friend. It's a great gift idea - especially for Mother's Day coming up (hint, hint!). Check out the details of what's included here.