Monday, January 11, 2016

Exploring new craft mediums

If you've read my last post, you know I've been busy (neglecting my family), um, excuse me - crafting! :) I wanted to share with you some of the other projects I've made with my new Cricut Explore.

We moved last March after 4 months of renovating. The basement where the kids' playroom and my craft space was usable but the last to get organized. Around Thanksgiving, orders started arriving for custom cards and other gifts so I had to whip my space into shape fast! While it's still not perfect (I need to hire an electrician to add more lights and outlets) but it's usable for every craft I'm currently into.

I love that I can create while the kids play and I can still referee if need be. In fact, these two projects both happened while I had double my normal amount of kids around! :)

I made the pillow cases to fit some of our couch pillows I've gotten tired of looking at and then used HTV (heat transfer vinyl) to quickly embellish. My hubby had no luck hunting this year so the camo pillow was a joke - I wanted to help him visualize what he's supposed to see through his scope ... he took it well, after throwing the pillow at me! :)

Thanks for looking!

Saturday, January 9, 2016

January Joyful Stars Blog Hop

Happy New Year!

Welcome to the January Edition of the Joyful Stars Blog Hop! If you've arrived from Lori's blog then you're on the right track. If you're starting here, follow the link at the bottom of the post to hop over to the next post. Keep going till you come back to where you started. If you get lost, see Joyce's blog for a complete list of participants.

For Christmas, I finally wore my husband down and bought myself a new Cricut Explore "from him". :) Since it's arrival in my house, my kids have been neglected, dinners have been "leftovers" and the laundry is stacked in various piles around the house (I've lost track of what's clean or dirty, but whatever!)

I have been crafting up a storm! The ease of cutting and searching my images to find *just the right thing* is just divine! Even though I've had an Expression for what seems like eons, the finesse of the Explore is the creme de la creme of home crafting!

I'm learning to use the software to plan out my scrapbook pages, letting the machine do it's thing and relax in front of the tv catching up on my favorite shows while I assemble my cuts - it's everything I've ever wanted!!!

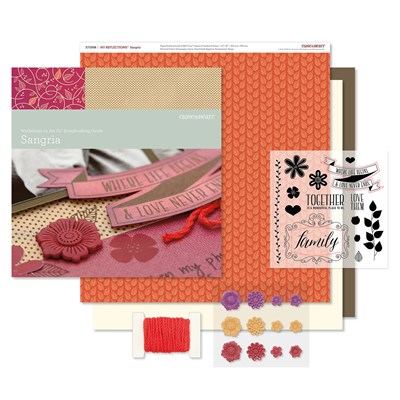
Of course, as I went searching for something to share with you tonight, I couldn't find just the right piece - I wanted something out of the new Seasonal Expressions to share with you and it seems like the perfect time to share with you the Charlotte Workshop Your Way PML layouts.  Have you seen this new line of papercrafting!?!? It's awesome! This one kit includes instructions for 3 layouts, 6-9 cards (depending on the kit) and a PML layout!! It's the one perfect kit for every crafter! My sister consultants and I traveled to Philadelphia last month for some training from the Home Office on this new item and It. Was. Awesome!! I loved hearing first hand how the kit evolved from the WOTG and why they were adding this new line to better meet the needs of customers (and consultants too).

The Charolotte WYW kit is so adorable! I'm not a girly-girl but I love the mix of neutrals with the pop of Sorbet ... I can easily mix photos of both of my kids on one layout with this paper pack and the doodles are so on trend my heart is fluttering! :)

Anyway, by now you're even wondering if I'm going to show you anything ...  your wait is over! ;)


A predesigned PML layout really too easy to brag about on a blog hop so I spiced it up with a few of my own "designed" PML cards. I used my new Explore (naturally) to easily cut a few images from the new Artistry cartridge and voila!


This part was fun - one of the selling points of our new house was the wild life! My hubby loved that he could hunt from his front porch (not that I let him, for the record, that's my spot!). 


This PML served as the title of the page: it doesn't matter where my family is as long as we're together, we're home. 


 Now you're off to Yvonne's blog to see what she's created to share with you. See you next month!

Wednesday, December 9, 2015

December Joyful Stars Blog Hop

Welcome to the December edition of the Joyful Stars Blog Hop!


If you've arrived from Krista's blog, you're on the right track. Just keep following the links to "hop" around to see everyone's creation. If you get lost, check out Joyce's blog for a complete list.

Since it's December, I wanted to share with you a quick craft I made using our 3 ring Kraft binder and our Cricut cartridges. I had a vendor show this past week where the organizers wanted the direct sales consultants to have cash and carry on hand instead of guests placing orders. Being so close to Christmas, this was a fabulous idea. I had so much fun creating lots of treat bags (love the Cricut cartridge Artiste for this!), treat tin kits (just add chocolate) and decorating a few of the My Crush books for teens to add their photos from their phones for a quick gift to give their friends. The biggest hit was this Kraft binder I made that would be perfect to store Christmas cards or for the December Daily photo challenge.


I used the Artbooking Cricut cartridge to cut "Christmas" out of Cranberry cardstock (the numbers came from Jasmine, a non-CTMH cartridge). The holly came from Artistry. I used our Carmine Shin Han marker to color the berries red since they cut out of the same layer as the holly leaves. It saved some paper instead of cutting out red leaves and berries. I inked the holly leaves in Olive on Garden Green (retired) cardstock. 


On the binding, I cut numbers out a bit smaller to easily identify the book when it's on the shelf.


This was a fun project to make that I actually made a few of these. I then used the negative space from the cardstock to stencil "Christmas" and "2015" onto the Christmas My Crush book with Cranberry pigment ink. Unfortunately, that book sold before I remembered to take a picture of it.

What would you use this binder for?

Now you're off to see what Nancy has made to share. See you next month!

Monday, November 16, 2015

Second Sympathy Card

Since I won't get into my scrap room for a few more days I wanted to share the second Sympathy Card I made with you today instead of last week. Hopefully, I will have something to share with you by Wednesday.

This is a card I made with some paper & ribbon scraps.

CMTH Sympathy Card by Stephanie Huber
This time, I used a technique I found here for inking embossing folders. I had never tried it and I'm pleased with the results. I hope to keep playing around with this technique in the future.

I used Whisper ink on the Quadafoil embossing folder then layered it over Slate cardstock over a black cardstock card base. I used Slate ink on the stamp from "4 My Friend" stamp set and layered it over Smokey Plum cardstock. The Black Striped ribbon is the last scrap I have (*sniff*) and I stapled it together for interest.

See you soon!

Friday, November 13, 2015

Sympathy Card

Now that Little Miss is in preschool a few mornings a week and I seem to be in a new routine keeping up with everything else, I have found a few moments to my self during the week. This is actually my second time in my scrapbook room this week and I am thrilled! My son is quick to say when I get grumpy: "Mommy, you need a timeout in your scrapbook room". I love that kid, he's so smart! :)

I just gave a verbal agreement to do a vendor show in a few weeks and checked out my ready made cards only to find I don't have any sympathy cards. I think I knew this but with the busy-ness of the last year I never made it a priority to get ahead in making some extras.

I pulled out my bag of leftover scraps from the retired paper pack "For Always" and started measuring. I found I had enough scraps to piece together a few cards very quickly. I used a little Smokey Plum cardstock for a pop of color.

 
CMTH Sympathy Card by Stephanie Huber

I used the "Rosy Regards" stamp set in Blush and Hollyhock inks for the rose, Sweet Leaf on the leaf and White Pigment in for the flourish from the "Live Laugh Love" stamp set. I also used some new Silver Foil tape to add a bit of sparkle. 

I have found (from experience, ahem) that when I make the time to sit down to make one card, it's best to just mass assemble as many as I can. I made 2 of these before my scraps gave out. So I designed another card with the scraps I had left. But I'll share that one on Monday. *wink*

For more information about the vendor show I'll be at in a few weeks, check out my Facebook page for information. See you next week!

Wednesday, November 11, 2015

Zoe WOTG Layout

Last week I sat down to scrap for the first time in ages .... only to discover - - I had no photos to scrap!!! And here I thought I wasn't scrapbooking because I didn't have any time, silly me! ;)

So after getting prints from Snapfish, I was able to sit down today and scrap the photo I wanted to do last week.

CMTH Zoe WOTG Layout 1 by Stephanie Huber

I used the WOTG guide to create the whole layout but only put one photo on the left page and used the other photo box for journaling. Since I scrapbook chronologically and the next photos don't work well with the colors of Zoe, I will use another layout for those (hopefully, coming soon!). The title box/banner was supposed to span both pages but since they probably won't be next to each other in the album, I moved the whole thing to the right page. 

Here's a close up of the left page: 
CTMH Zoe WOTG Layout 1, page 1 by Stephanie Huber

I want to do a title on this page but I'm having trouble coming up with something. Any recommendations???

Here's a close up of the right page, for a future project:
CTMH Zoe WOTG Layout 1, page 2 by Stephanie Huber
I had a lot of fun using these pretty papers to get back into scrapping. I'm hoping to do some more now that I'm all set up with photos! :)

Leave me a comment with your title suggestions! See you soon!

Thursday, October 15, 2015

Sangria Scrapbooking Workshop

This is the perfect kit for your fall scrapbooking pages: The Sangria Scrapbooking Workshop on the Go. Each kit includes (6) B&T papers (2 each of 3 designs), coordinating cardstock, an exclusive stamp set and matching accessories. Plus a full color cutting guide. All for $29.95, a savings of $9!


Here are the two layouts in guide. 


Want more inspiration? Check out #ctmhsangria on your favorite social media.